NeuraTiM FrameOSU

Make your first reel

Make a reel by choosing parts, then refine those parts. Follow these actions in order for a first project. Use the separate interface reference whenever you need to identify a button or understand a setting.

On this page
  1. Start with your media
  2. Choose the useful moments
  3. Arrange your parts
  4. Refine a video part
  5. Add titles and overlays
  6. Add photos to the story
  7. Choose and fit the music
  8. Connect the parts
  9. Watch, save and export
  10. Let Auto Reel choose a first draft
  11. AI assistant

Start with your media

On Home, choose Manual edit, then choose videos. For a photo or text story, start with an empty reel and add a blank source. Choose the reel's aspect ratio for its destination. You can use the included practice media through the guided introduction in Settings. Keep original files where the app can find them.

Open in the app: Home
Start with your media
Start with your media · Desktop

Choose the useful moments

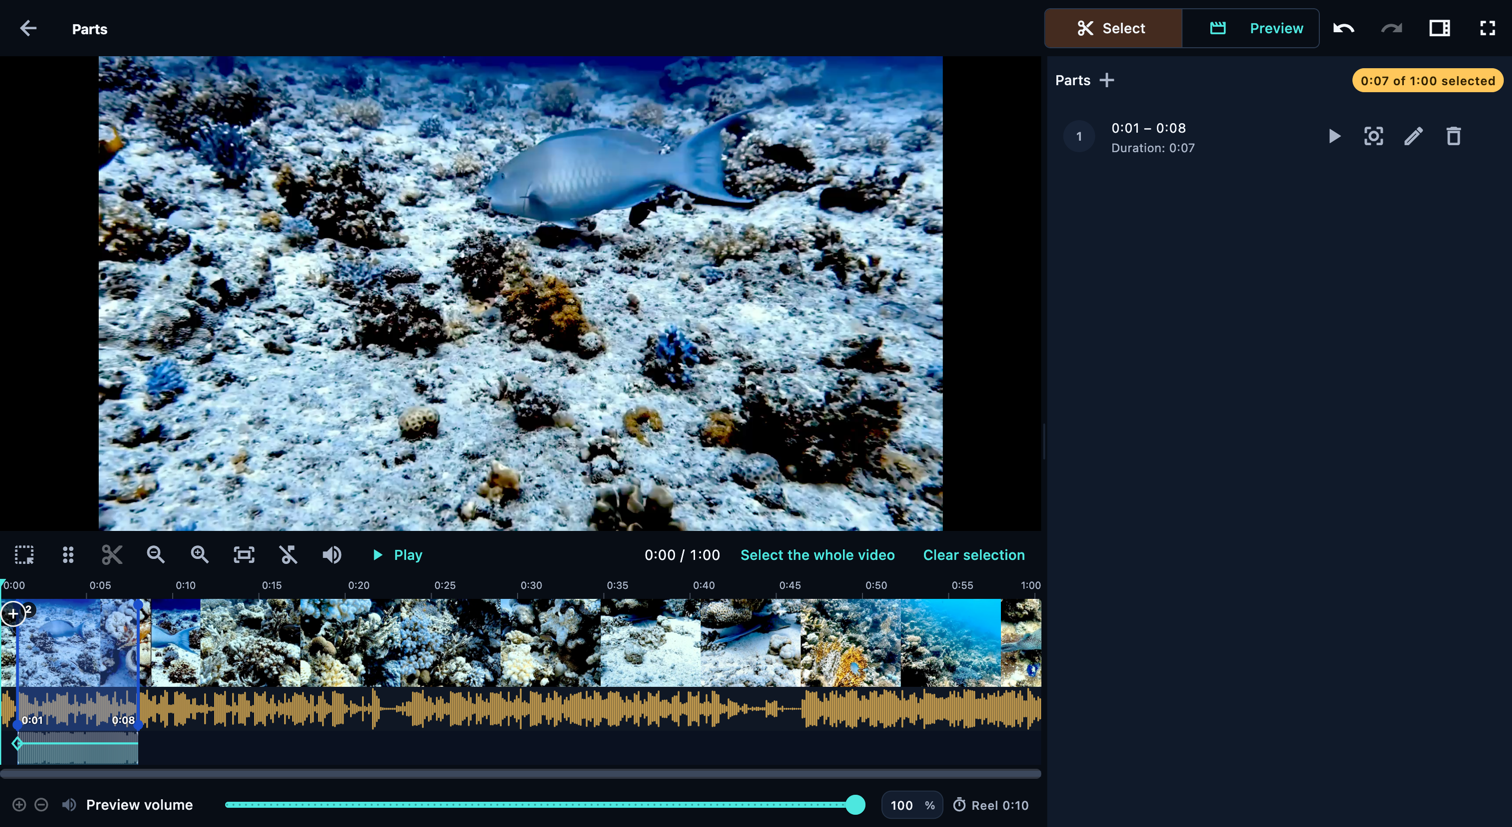
Open a video source and stay in Select. Move the playhead to the start you want, press +, then tap the filmstrip at the end. Repeat for each useful moment. Add part by time lets you enter precise source times. Select shows the original recording; Preview plays the parts you chose. Their durations and order determine what appears in the reel.

Open in the app: Sources, in order → Open the video’s source card (scissors icon) → Select

If the parts panel is hidden, tap Show the parts panel on a phone. On desktop, open View (the panel icon) and enable Parts. The + button in the panel header adds a part by time in Select, or opens the text/photo menu in Preview.

Choose the useful moments
Choose the useful moments · Desktop

Arrange your parts

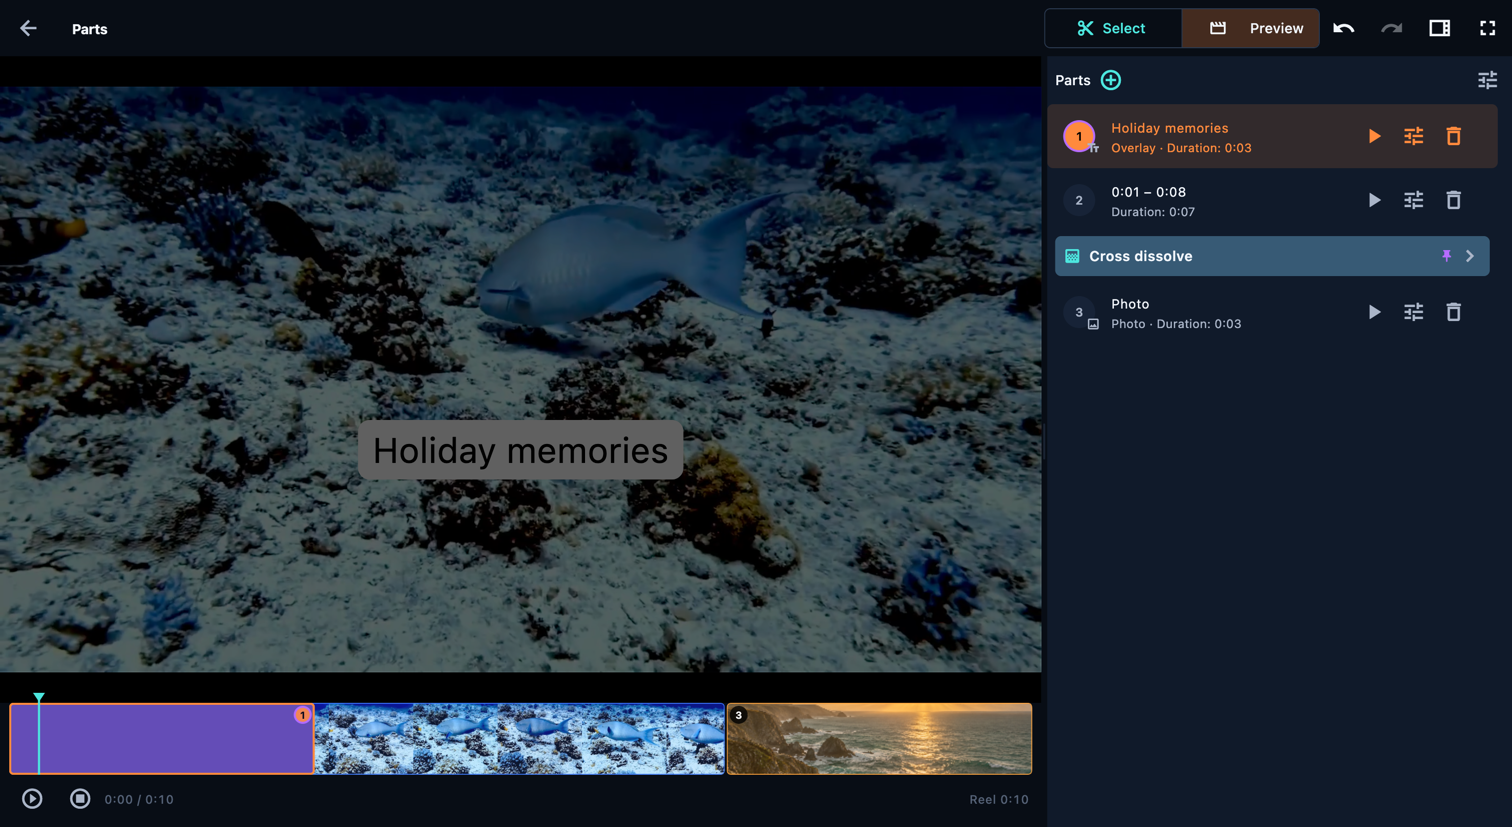
Switch to Preview to watch the selected parts with their edits. The parts list is the running order. Drag a numbered handle, or enable reorder mode, to move a part. A normal timeline drag moves the playhead. Open a part's settings to edit just that part; Settings for all parts applies shared changes to this source. Recheck the order after adding text or photos.

Open in the app: Sources, in order → Open the video’s source card (scissors icon) → Preview

If the parts panel is hidden, tap Show the parts panel on a phone. On desktop, open View (the panel icon) and enable Parts. The + button in the panel header adds a part by time in Select, or opens the text/photo menu in Preview.

Arrange your parts
Arrange your parts · Desktop

Refine a video part

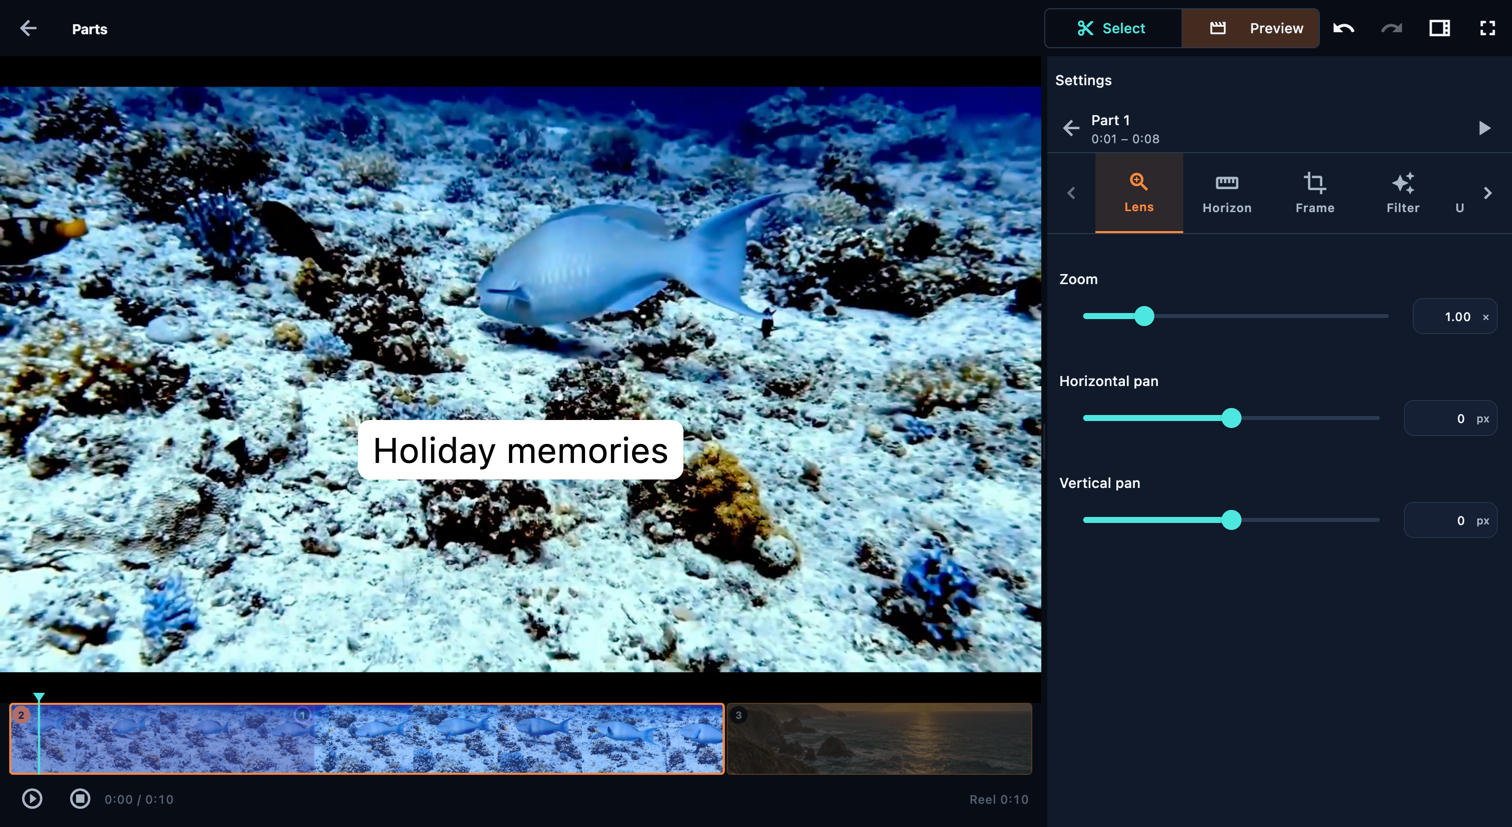
Open a video part's settings. Trim changes the source start and end. Lens and Frame adjust composition; Horizon straightens it. Filter and Adjust change the look; Underwater corrects a colour cast when appropriate. Effect adds movement or a spotlight. Volume changes this part's audio, and Speed changes how time passes. Preview after each substantial change.

Open in the app: Sources, in order → Open the video’s source card (scissors icon) → Preview → Edit

Use the arrows beside the inspector tabs to reveal more tabs. Scroll inside the settings panel to reach controls below.

Refine a video part
Refine a video part · Desktop

Add titles and overlays

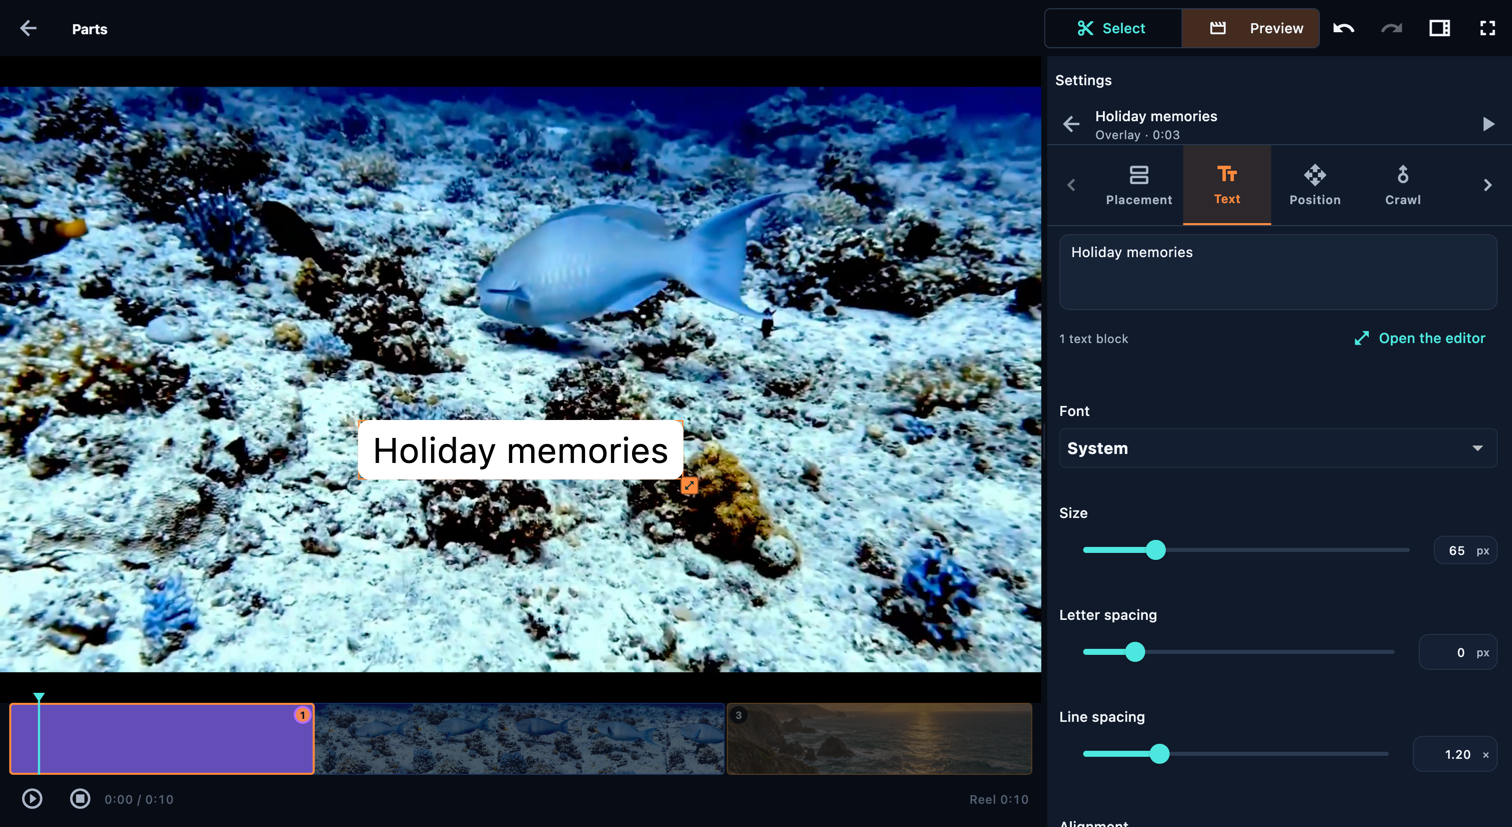
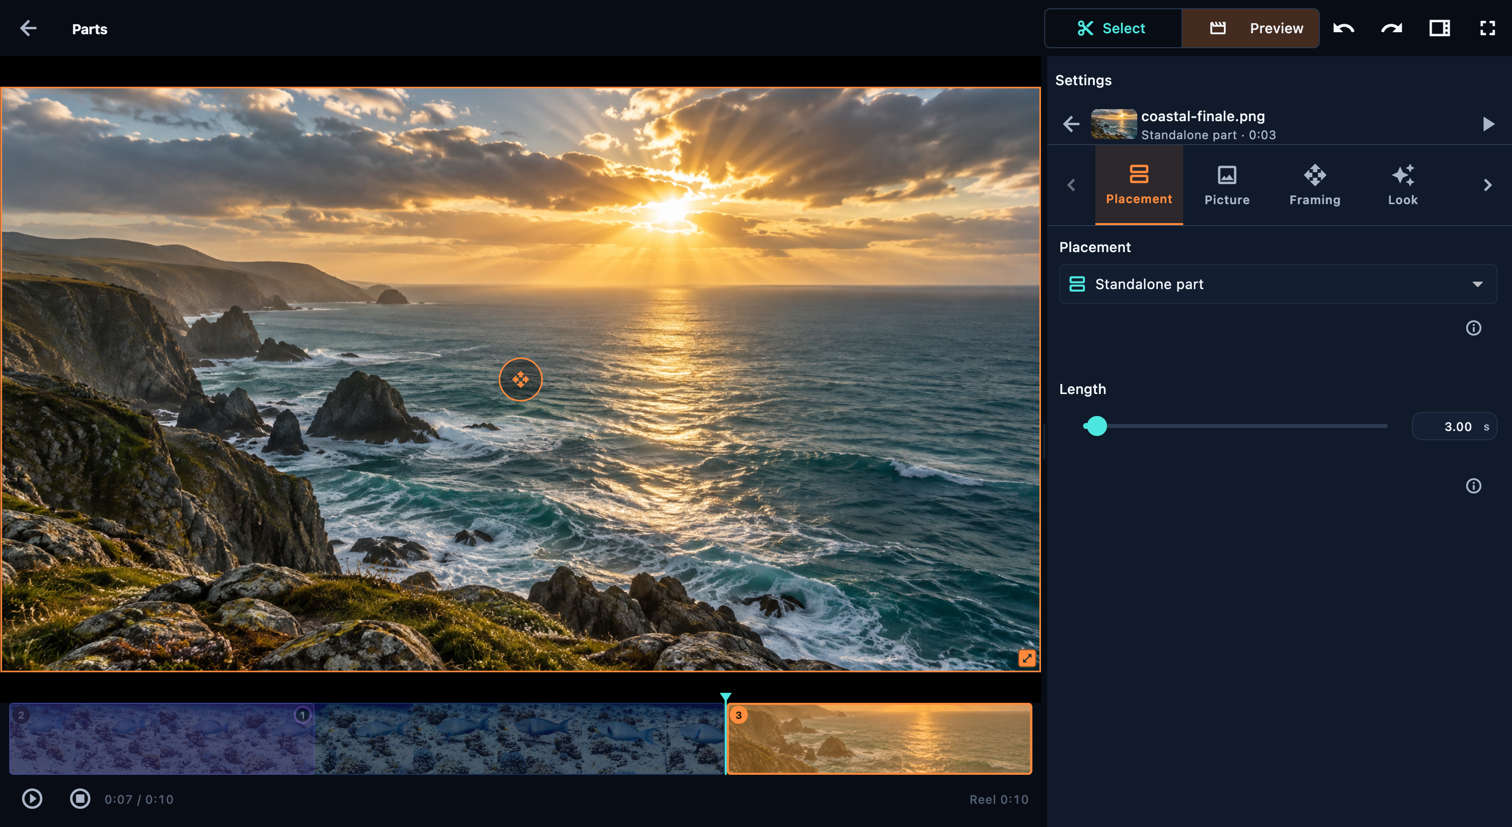
Choose Add text beside a part. In Placement, Standalone part gives the text its own time; Overlay puts it over the continuing picture without extending the reel. Overlay together shares the next overlay's time. Enter your words in Text, set Position, and use Crawl and Motion for animation. Steps appears for row-based crawl timing. Colour is the background of a standalone text part.

Open in the app: Sources, in order → Open the video’s source card (scissors icon) → Preview → Add to this source → Add text → Add before / Add after

Use the arrows beside the inspector tabs to reveal more tabs. Scroll inside the settings panel to reach controls below.

Add titles and overlays
Add titles and overlays · Desktop

Add photos to the story

Use the + menu beside a part to add a photo. Choose Standalone part for a timed photo in the sequence, or Overlay to show it over the continuing picture. Adjust Picture, Framing, Look and Effect; Colour controls the background of a standalone image. Add text as a separate item when the photo needs a caption.

Open in the app: Sources, in order → Open the video’s source card (scissors icon) → Preview → Add to this source → Add image → Add before / Add after

Use the arrows beside the inspector tabs to reveal more tabs. Scroll inside the settings panel to reach controls below.

Add photos to the story
Add photos to the story · Desktop

Choose and fit the music

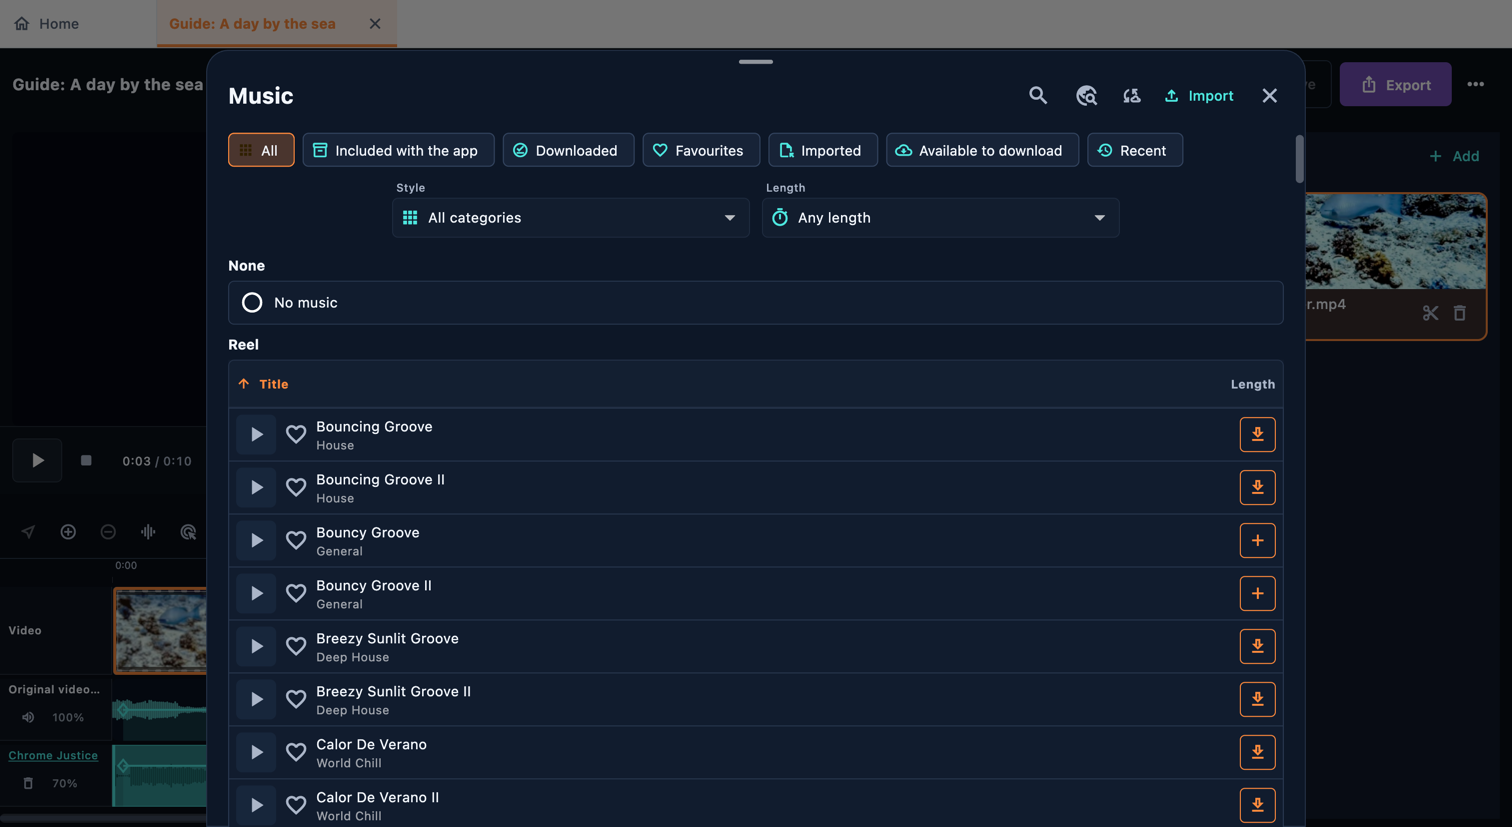
In the reel editor, open Music. Search by title or narrow the library by category, length and availability. Play preview auditions a track; + adds it to the reel. Included tracks work offline; other library tracks may need a download. You can also import an audio file. Open the music block to set when it starts and ends in the reel, where it starts inside the song, and its volume. Set fades in the main music panel. Adding the first track mutes source audio; restore the source or part volume if you want a mix.

Open in the app: Reel → Music

Choose and fit the music
Choose and fit the music · Desktop

Connect the parts

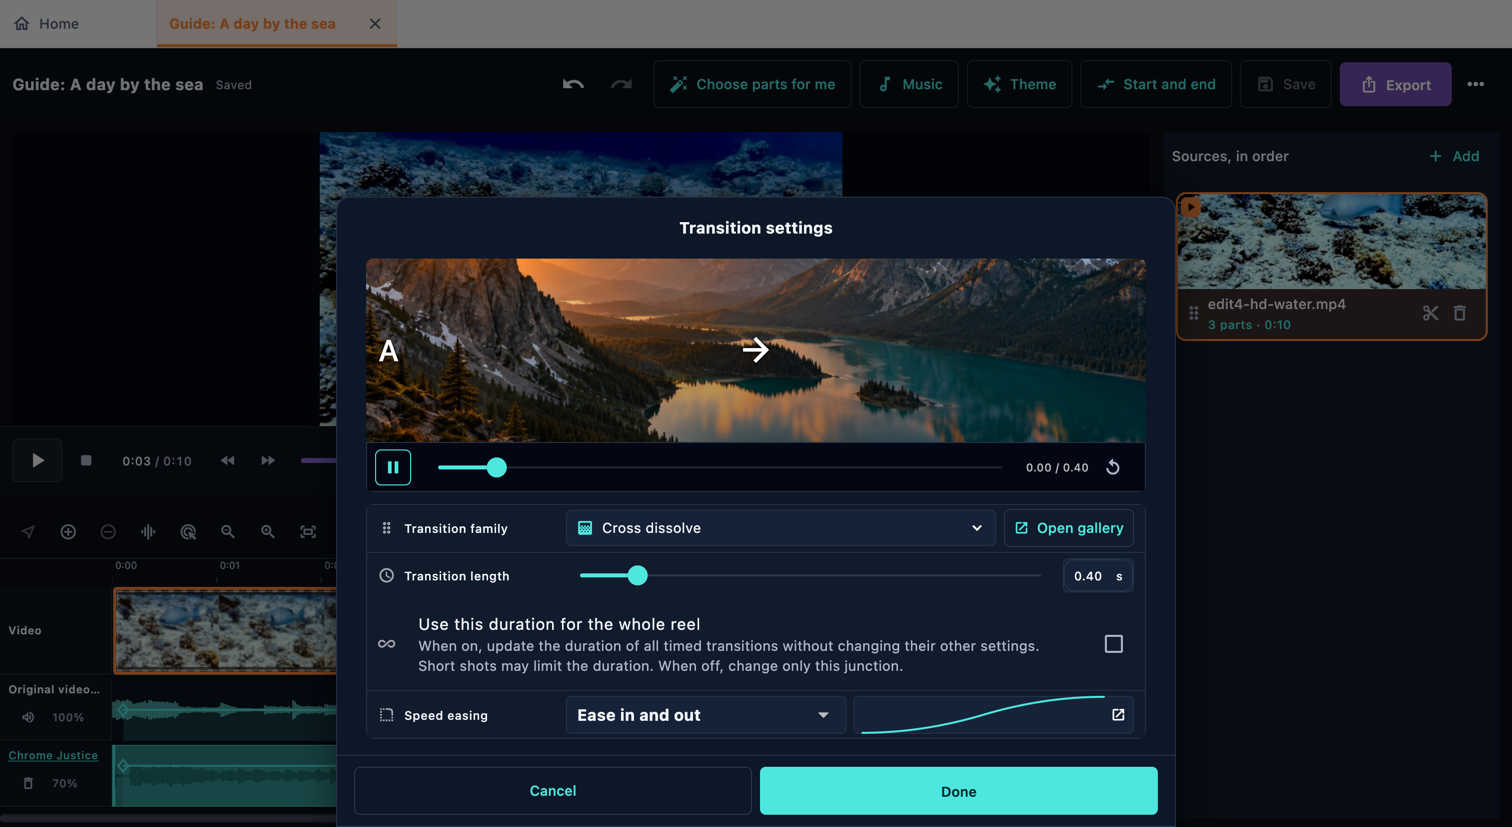
Open the transition row between two parts. Preview choices in the gallery, pick one and set its timing, then confirm. Watch the join in context: a transition can hide a short action or text. Start and end treatments belong to the reel, while a join connects its neighbouring parts.

Open in the app: Sources, in order → Open the video’s source card (scissors icon) → Preview → Transition between parts

In the reel toolbar, choose Theme. If it is hidden, expand the … menu and choose Theme. This sets the reel’s transition style. Interface colours are under Settings → Theme.

Connect the parts
Connect the parts · Desktop

Watch, save and export

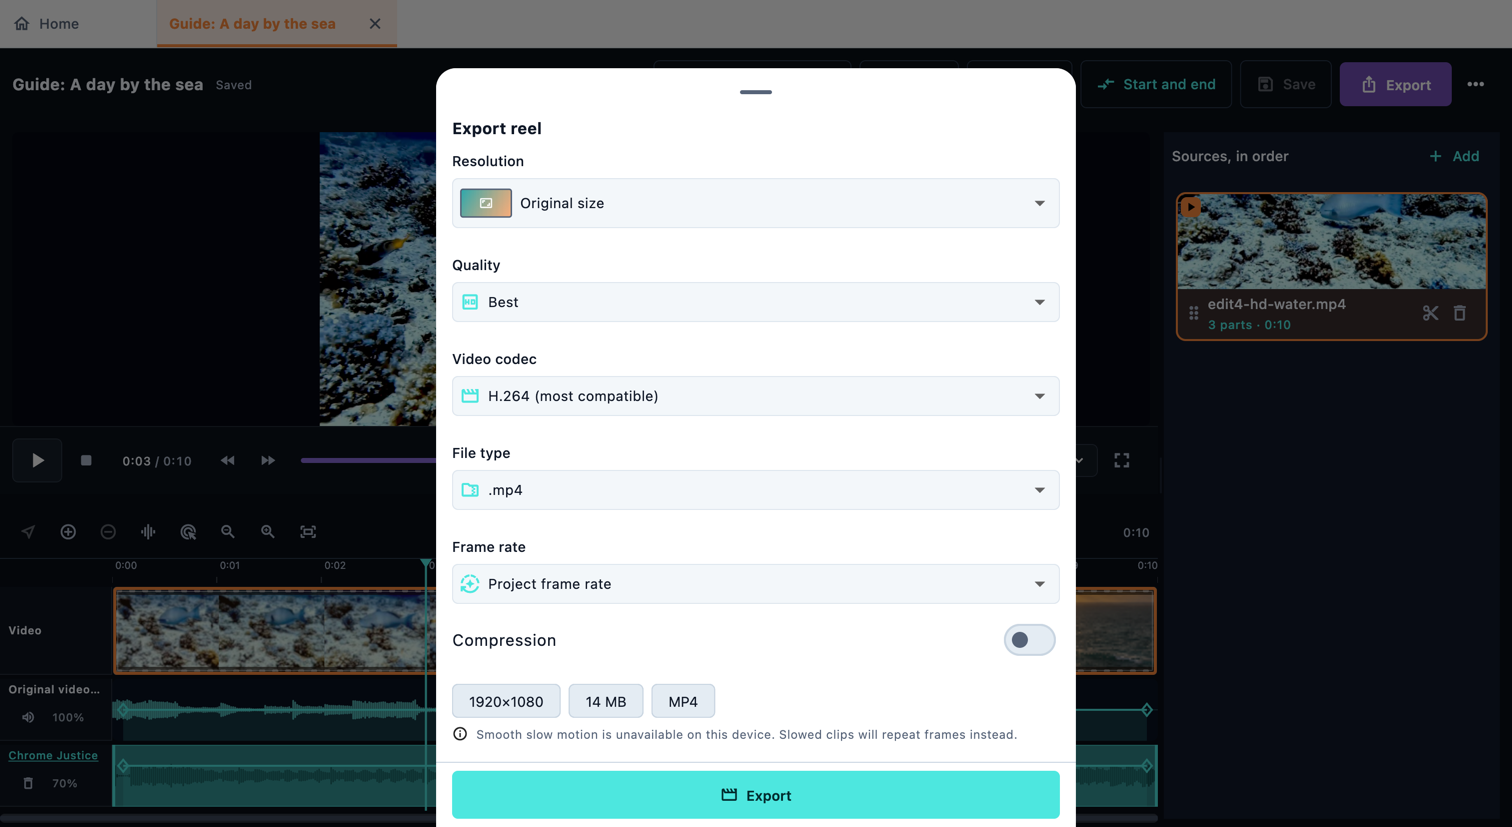
Return to the Reel page and watch from beginning to end with sound. Check the first frame, every join, text readability, music and the ending. Save the editable project, then open Export. Choose the size, quality and a format your device supports. Wait for completion and open the exported file to check it. Saving a project and exporting a video are different actions.

Open in the app: Reel → Export reel

Watch, save and export
Watch, save and export · Desktop

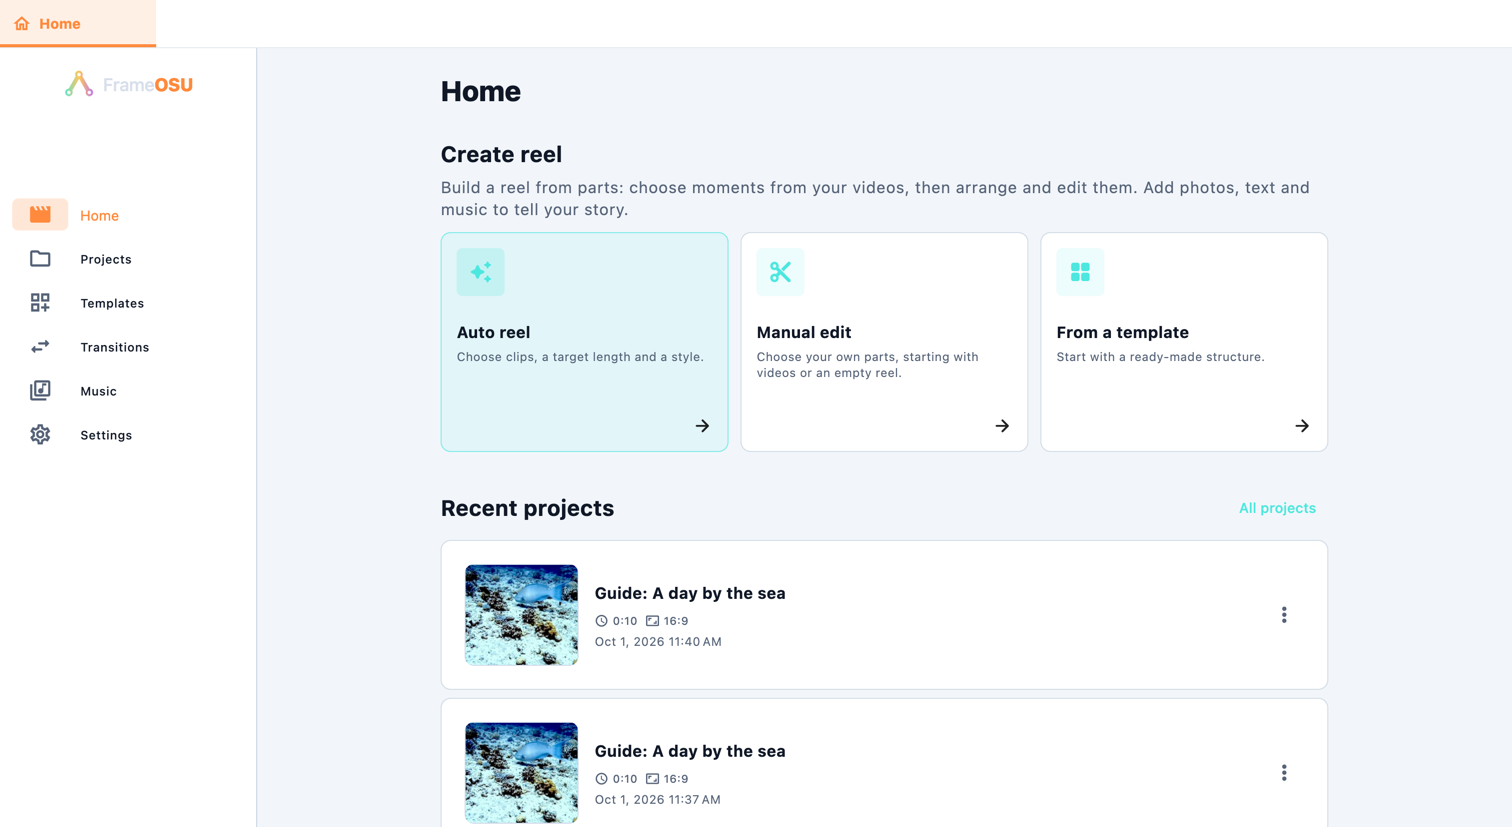
Let Auto Reel choose a first draft

Prefer a first draft? Open Auto Reel, add your videos, choose a duration and music, then set pacing, ordering and analysis precision. The app analyses footage, checks scenes and image quality, reads the music, arranges parts and reviews the result. More footage, higher precision and underwater correction mean more work on your device. It can take several minutes; follow the progress stages. Review and edit the resulting parts before exporting.

Let Auto Reel choose a first draft
Let Auto Reel choose a first draft · Desktop