NeuraTiM FrameOSU

Interface reference

Find your screen, then select a ring on the image or a control name to read its explanation. The selected ring stays transparent so you can see the app underneath. Choose Phone or Desktop to match your layout, and enlarge any image for a closer look.

On this page
  1. Home
  2. Projects
  3. Reel
  4. Select
  5. Parts
  6. Part settings
  7. Add text
  8. Add image
  9. Crawl
  10. Music
  11. Music block settings
  12. Transition between parts
  13. Auto Reel
  14. Templates
  15. Settings
  16. Export reel
  17. AI assistant
  18. AI assistant

Home

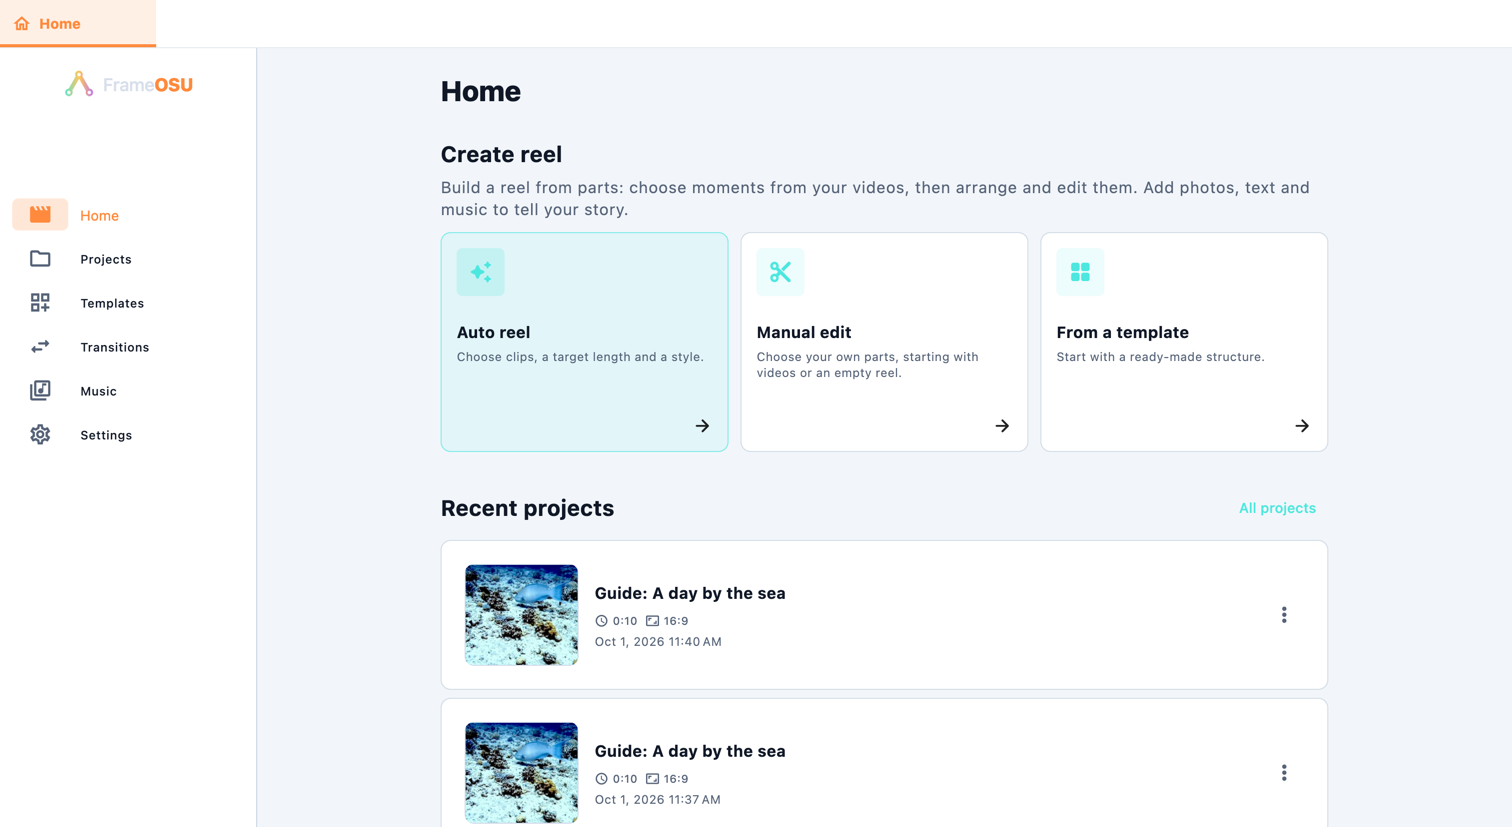
Build a reel from parts: choose moments from your videos, then arrange and edit them. Add photos, text and music to tell your story.

Open in the app: Home
Home
Home · Desktop
Home · Desktop

Select an explanation to highlight its control or the entry point for the route shown. The image changes when another scroll position is needed. Rings remain transparent; enlarge the image to read small details.

Controls on this screen

  1. Manual edit

    Open in the app: Manual edit

    Choose your own parts, starting with videos or an empty reel.

    • Choose videos first
    • Start empty
  2. Auto reel

    Open in the app: Auto reel

    Choose clips, a target length and a style.

    • Auto Reel
  3. From a template

    Open in the app: From a template

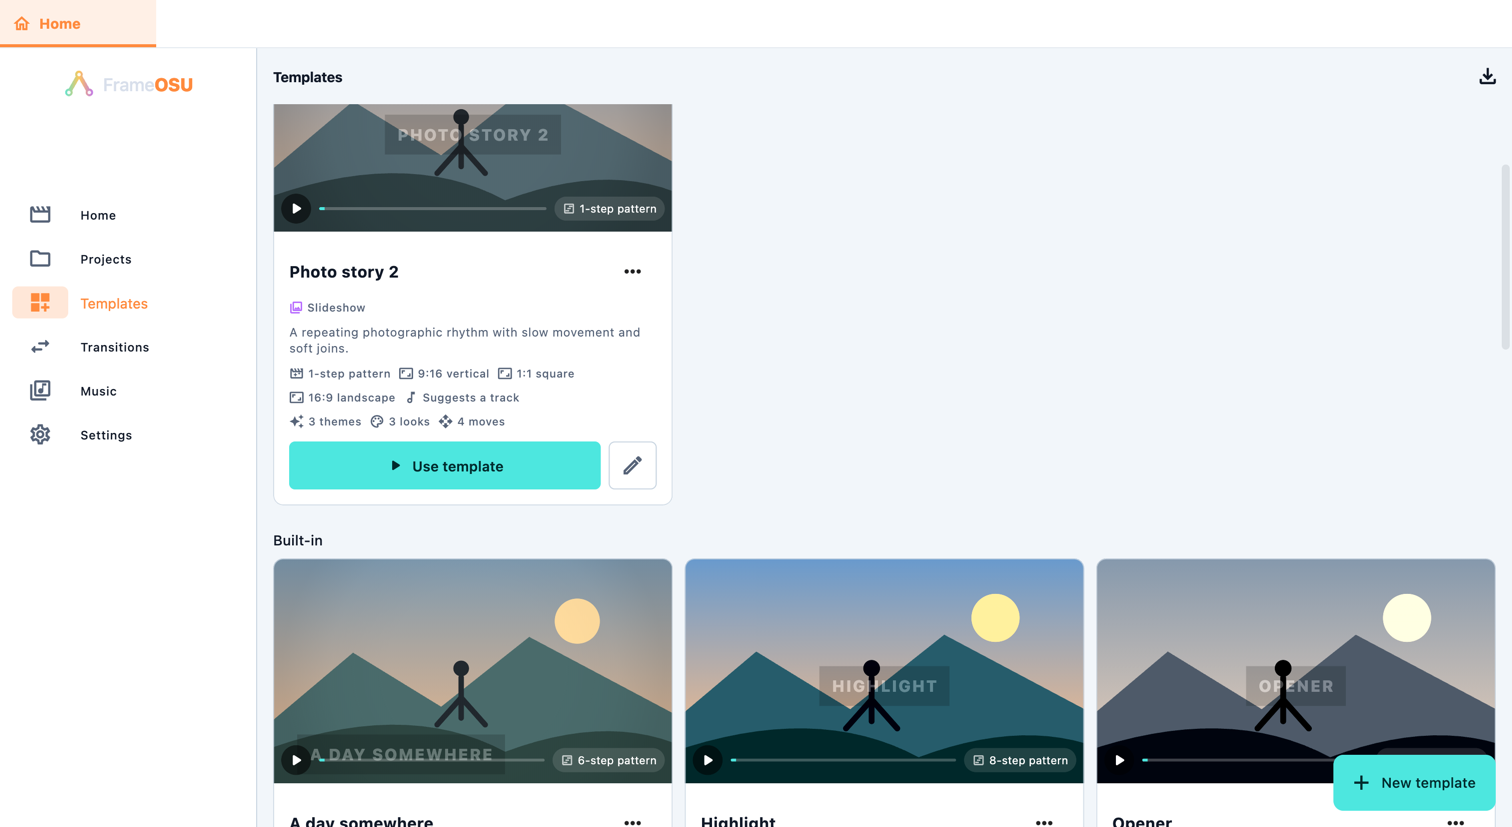
    A template combines a transition theme, looks, movement, a part pattern and music choices. It still needs your media. Inspect its settings, use it, then review the resulting parts. Choose New to create a template, or duplicate one to edit your own version. Pattern steps control allowed media, relative length and movement; an automatic pattern lets the app choose.

    • Templates
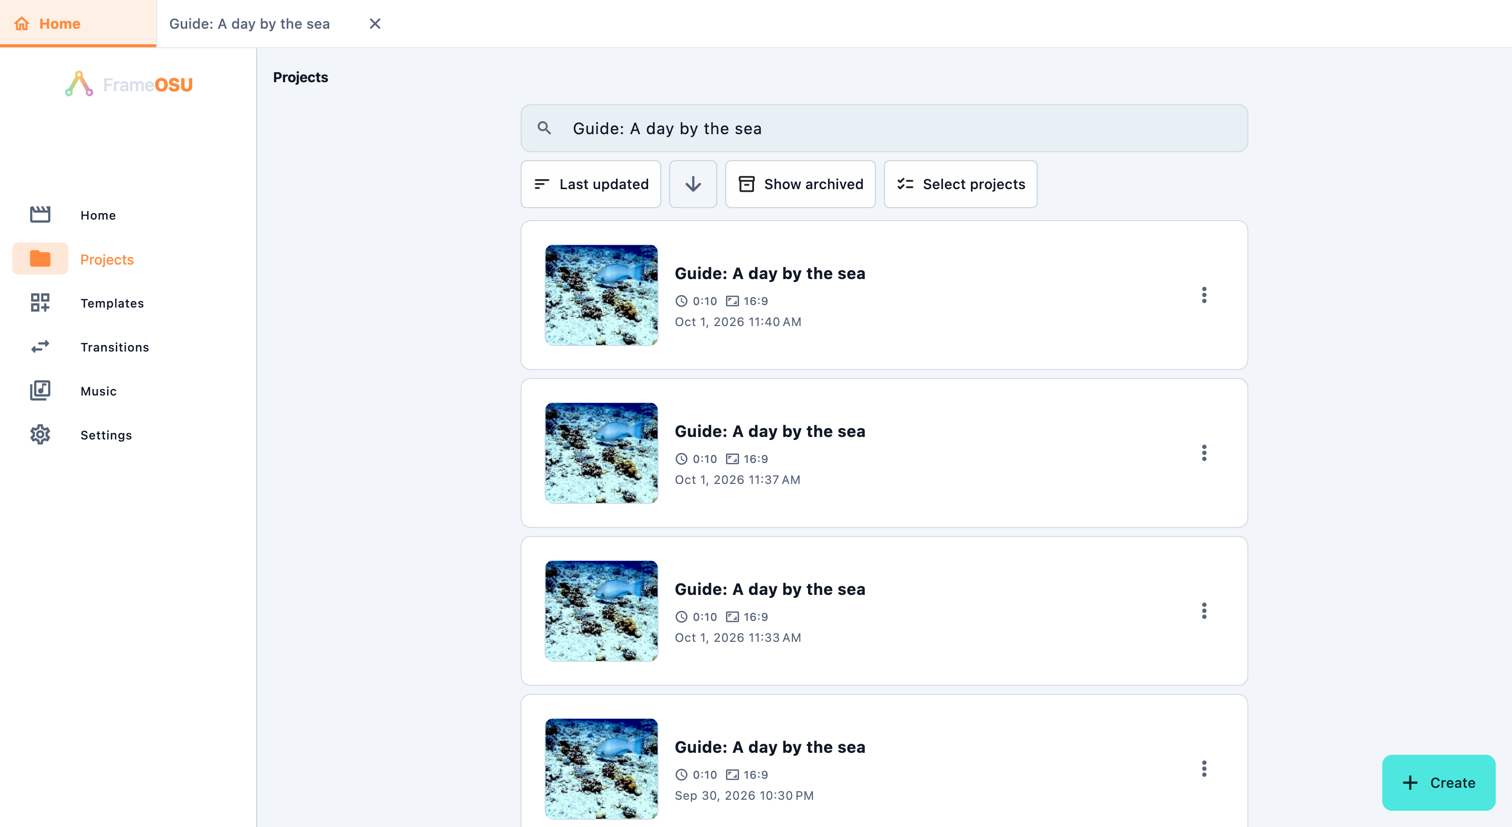
  4. Projects

    Open in the app: Projects

    Open a saved project to keep editing. Rename changes its name; Duplicate creates another project. Search and sort help you find a reel. Archive hides a project from the usual list; Show archived lets you restore it. Deleting a project does not delete its original media files. Keep those files available so the project can reopen them.

    • Home
    • Projects
    • Templates
    • Transitions
    • Music
    • Settings

Projects

Open a saved project to keep editing. Rename changes its name; Duplicate creates another project. Search and sort help you find a reel. Archive hides a project from the usual list; Show archived lets you restore it. Deleting a project does not delete its original media files. Keep those files available so the project can reopen them.

Open in the app: Projects

Projects
Projects · Desktop
Projects · Desktop

Select an explanation to highlight its control or the entry point for the route shown. The image changes when another scroll position is needed. Rings remain transparent; enlarge the image to read small details.

Controls on this screen

  1. Search projects

    Open in the app: Search projects

    Open a saved project to keep editing. Rename changes its name; Duplicate creates another project. Search and sort help you find a reel. Archive hides a project from the usual list; Show archived lets you restore it. Deleting a project does not delete its original media files. Keep those files available so the project can reopen them.

    • Sort
    • Last updated
    • Date created
    • Name
    • Duration
    • Size
    • Ascending
    • Descending
  2. Rename

    Open in the app: More → Rename

    Open the ⋮ menu on the project card, then choose Rename or Duplicate.

    Save keeps the editable project. Rename changes this project's name. To make a separate version, use Duplicate in Projects. Undo and Redo step through edits; Export creates a video file.

    • Duplicate
  3. Archive

    Open in the app: Archive

    Open a saved project to keep editing. Rename changes its name; Duplicate creates another project. Search and sort help you find a reel. Archive hides a project from the usual list; Show archived lets you restore it. Deleting a project does not delete its original media files. Keep those files available so the project can reopen them.

    • Show archived
    • Restore from archive
  4. Select projects

    Open in the app: Select projects

    Open a saved project to keep editing. Rename changes its name; Duplicate creates another project. Search and sort help you find a reel. Archive hides a project from the usual list; Show archived lets you restore it. Deleting a project does not delete its original media files. Keep those files available so the project can reopen them.

    • Select all
    • Clear selection
    • Delete

Reel

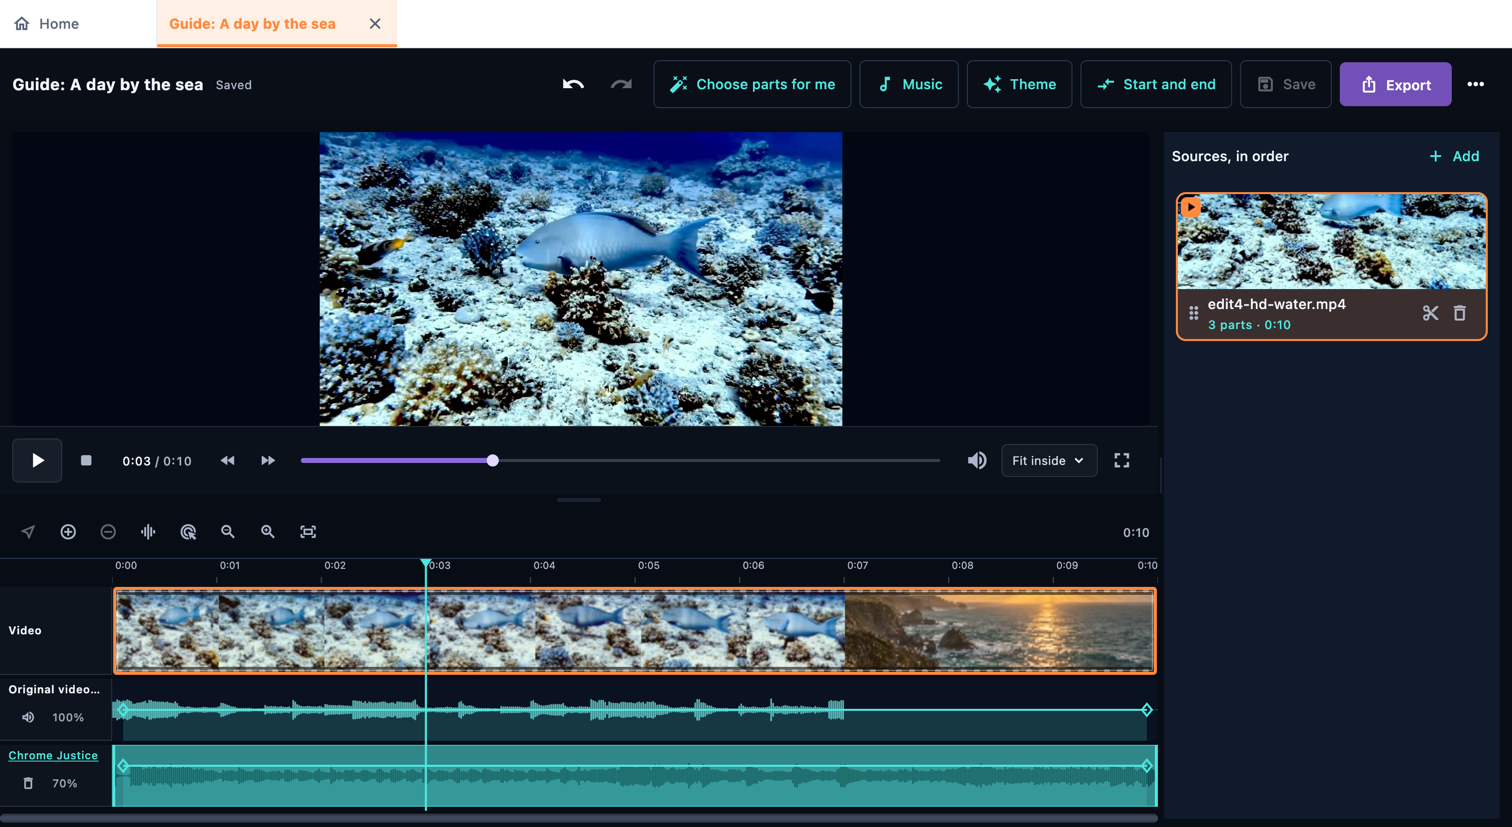
A source is a recording or a container for text and photos. A part is a piece you choose to use. The reel plays those parts in order. Importing a video does not mean using all of it: choose the moments first, then edit each part's framing, look, sound and timing.

Open in the app: Projects → Open a saved reel

Reel
Reel · Desktop
Reel · Desktop

Select an explanation to highlight its control or the entry point for the route shown. The image changes when another scroll position is needed. Rings remain transparent; enlarge the image to read small details.

Controls on this screen

  1. Sources, in order

    Open in the app: Sources, in order

    Import a video, then select the parts to use.

    Start without a video. Open this source to add, arrange and edit photos and titles.

    • Add
  2. Preview

    Open in the app: Preview

    Open a source in Sources, then select or add parts to put them on the timeline.

    • Play
    • Pause
    • Zoom in
    • Zoom out
  3. Theme

    Open in the app: Theme

    In the reel toolbar, choose Theme. If it is hidden, expand the … menu and choose Theme. This sets the reel’s transition style. Interface colours are under Settings → Theme.

    A theme chooses transitions throughout the reel. Transitions you set manually are kept.

    Mute every video part, including parts added later. Music and preview-volume settings are not changed.

    • Mute all source videos
    • View
  4. Save

    Open in the app: Save

    Save keeps the editable project. Rename changes this project's name. To make a separate version, use Duplicate in Projects. Undo and Redo step through edits; Export creates a video file.

    • Undo
    • Redo
    • Rename
    • Duplicate
    • Export reel

Select

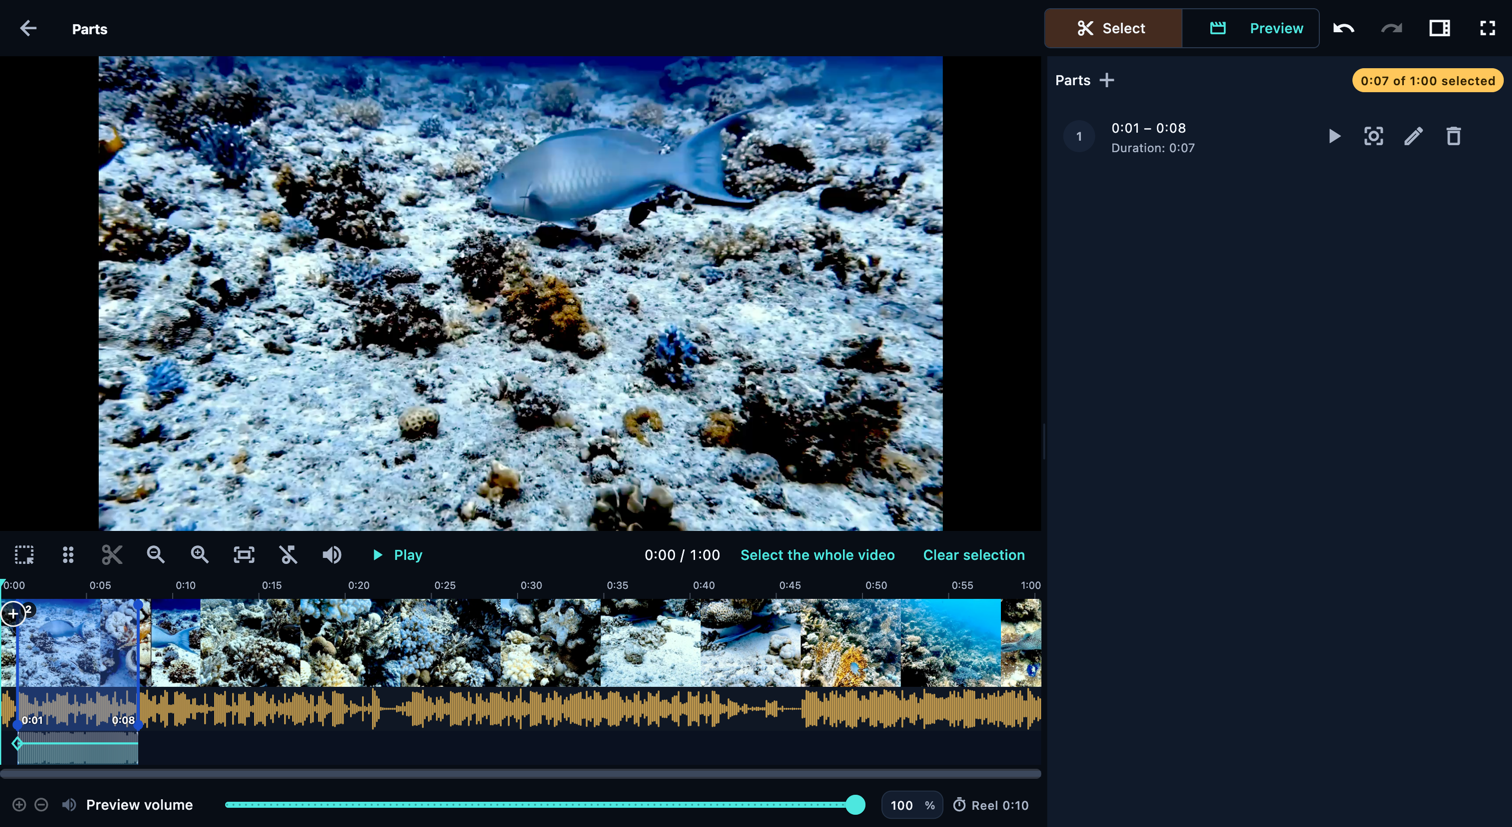
Tap a start on the filmstrip, press + beside the playhead, then tap an end. Use Add part by time for exact values. Drag an edge to trim. Use Scroll the timeline to pan and Reorder parts to move a part.

Open in the app: Sources, in order → Open the video’s source card (scissors icon) → Select

If the parts panel is hidden, tap Show the parts panel on a phone. On desktop, open View (the panel icon) and enable Parts. The + button in the panel header adds a part by time in Select, or opens the text/photo menu in Preview.

Select
Select · Desktop
Select · Desktop

Select an explanation to highlight its control or the entry point for the route shown. The image changes when another scroll position is needed. Rings remain transparent; enlarge the image to read small details.

Controls on this screen

  1. Select

    Open in the app: Select

    Select parts on the source video's timeline

    • Preview
  2. Start a part here

    Open in the app: Start a part here

    Tap a start on the filmstrip, press + beside the playhead, then tap an end. Use Add part by time for exact values. Drag an edge to trim. Use Scroll the timeline to pan and Reorder parts to move a part.

    • Cancel part selection
    • Add part by time
  3. Add part by time

    Open in the app: Add part by time

    Enter seconds, m:ss.fff, or h:mm:ss.fff. Milliseconds are optional.

    • Start
    • End
  4. Reorder parts

    Open in the app: Reorder parts

    This part follows the previous one. Drag its numbered handle in the list to reorder it. On the filmstrip, use Reorder parts; ordinary dragging moves the playhead.

    • Scroll the timeline
    • Select frames
    • Split the part here
    • Select the whole video
    • Clear selection
    • Fit the whole video in view
  5. Preview volume

    Open in the app: Preview volume

    Changes the volume on this screen only. To change the reel's audio, use the audio controls in the editor.

    • Play whole video
    • Play original audio
    • Play reel audio
    • Mute all parts
  6. Reel

    Open in the app: Reel

    Total duration of the reel, including all sources. It updates as you change the parts.

    • Show the parts panel

Parts

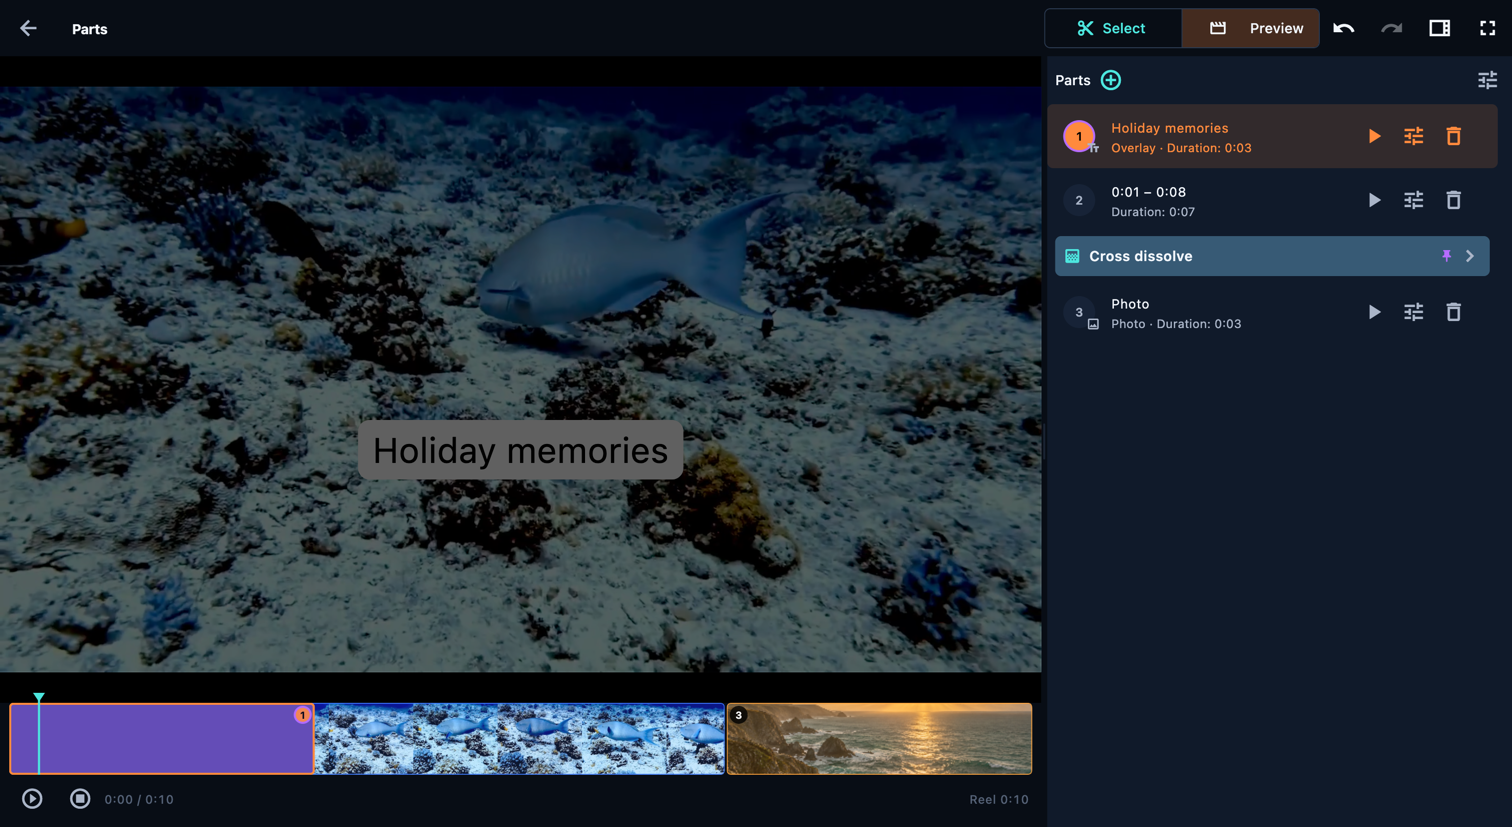
Watch selected parts with effects and transitions

Open in the app: Sources, in order → Open the video’s source card (scissors icon) → Preview

If the parts panel is hidden, tap Show the parts panel on a phone. On desktop, open View (the panel icon) and enable Parts. The + button in the panel header adds a part by time in Select, or opens the text/photo menu in Preview.

Parts
Parts · Desktop
Parts · Desktop

Select an explanation to highlight its control or the entry point for the route shown. The image changes when another scroll position is needed. Rings remain transparent; enlarge the image to read small details.

Controls on this screen

  1. Preview

    Open in the app: Preview

    Watch selected parts with effects and transitions

    • Play
    • Play this part
    • Stop
  2. Reorder parts

    Open in the app: Reorder parts

    This part follows the previous one. Drag its numbered handle in the list to reorder it. On the filmstrip, use Reorder parts; ordinary dragging moves the playhead.

    Drag along the block to move the playhead. Use Reorder parts to move the overlay in time, or drag its numbered handle in the list.

    • Part settings
    • Delete
  3. Add to this source

    Open in the app: Add to this source

    Use the + menu beside a part to add a photo. Choose Standalone part for a timed photo in the sequence, or Overlay to show it over the continuing picture. Adjust Picture, Framing, Look and Effect; Colour controls the background of a standalone image. Add text as a separate item when the photo needs a caption.

    Choose Add text beside a part. In Placement, Standalone part gives the text its own time; Overlay puts it over the continuing picture without extending the reel. Overlay together shares the next overlay's time. Enter your words in Text, set Position, and use Crawl and Motion for animation. Steps appears for row-based crawl timing. Colour is the background of a standalone text part.

    • Add image
    • Add text
    • Standalone part
    • Overlay
  4. Transition between parts

    Open in the app: Transition between parts

    Open the transition row between two parts. Preview choices in the gallery, pick one and set its timing, then confirm. Watch the join in context: a transition can hide a short action or text. Start and end treatments belong to the reel, while a join connects its neighbouring parts.

    • Open gallery
  5. Settings for all parts

    Open in the app: Settings for all parts

    Applies to every part unless a part has its own settings.

    • Apply this look to every part of this video

Part settings

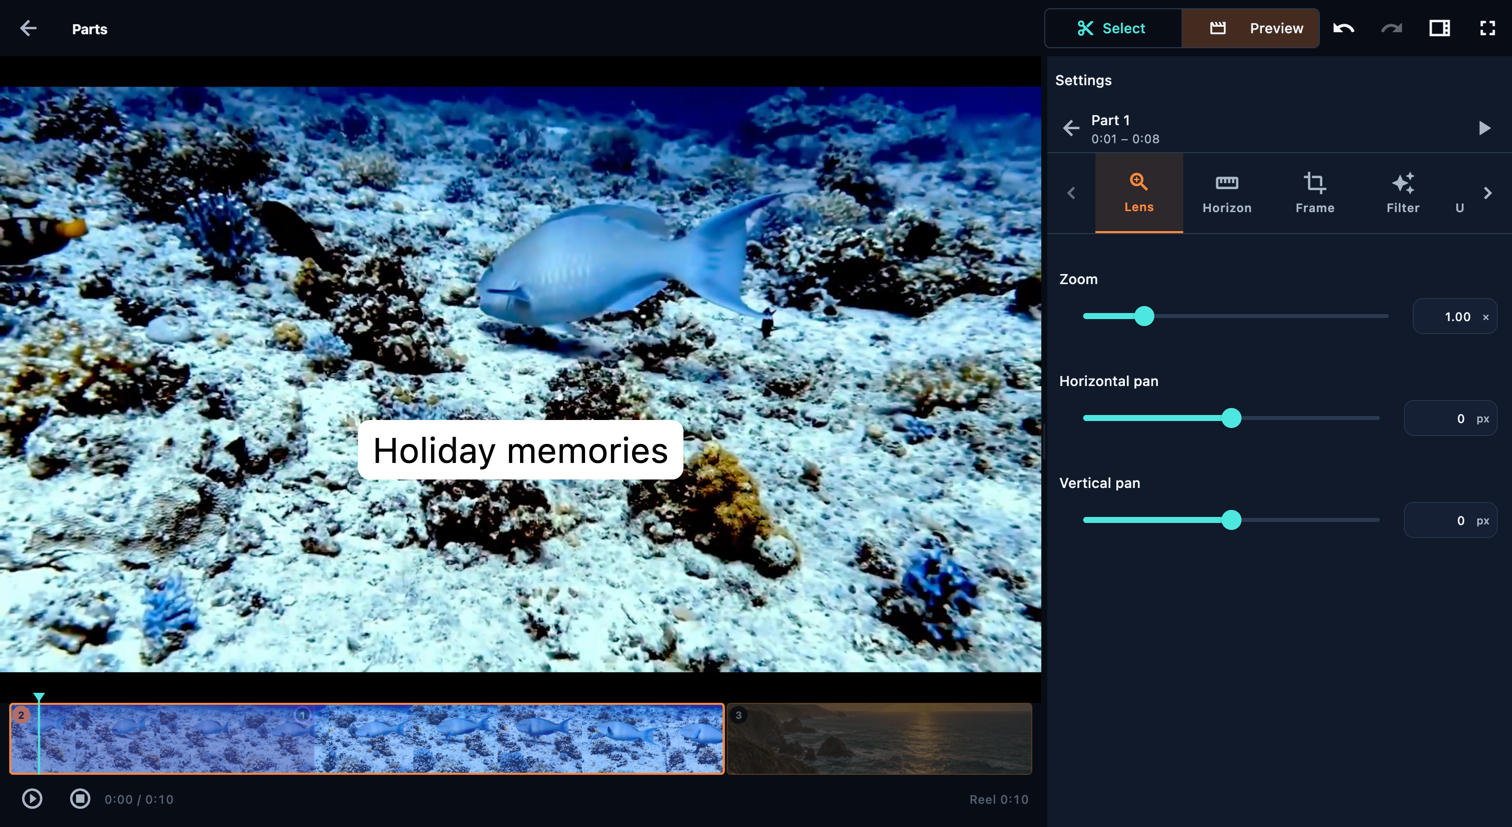
Open a video part's settings. Trim changes the source start and end. Lens and Frame adjust composition; Horizon straightens it. Filter and Adjust change the look; Underwater corrects a colour cast when appropriate. Effect adds movement or a spotlight. Volume changes this part's audio, and Speed changes how time passes. Preview after each substantial change.

Open in the app: Sources, in order → Open the video’s source card (scissors icon) → Preview → Edit

Use the arrows beside the inspector tabs to reveal more tabs. Scroll inside the settings panel to reach controls below.

Part settings
Part settings · Desktop

Select an explanation to highlight its control or the entry point for the route shown. The image changes when another scroll position is needed. Rings remain transparent; enlarge the image to read small details.

Controls on this screen

  1. Lens

    Open in the app: Lens

    Zoom magnifies the picture. Horizontal and vertical position move it inside the canvas. Use these to keep the subject in view after changing the reel's aspect ratio.

    • Zoom
    • Horizontal pan
    • Vertical pan
  2. Horizon

    Open in the app: Horizon

    Rotate to level the horizon. Positive values turn the picture clockwise.

    • Straighten
  3. Frame

    Open in the app: Frame

    Framing changes which edges of the picture are visible. Drag the frame handles or adjust the four crop values. Check the result in the reel's chosen aspect ratio. The flip switches mirror the picture horizontally or vertically.

    • Flip horizontally
    • Flip vertically
    • Crop left
    • Crop right
    • Crop top
    • Crop bottom
  4. Filter

    Open in the app: Filter

    Preview each look on this frame at the selected strength. Select one to apply it.

    100% applies the full look. Lower values blend it with the original.

    Fine-tune the look while keeping its base style and name.

    Compare the original frame with this part's adjustments. The split view is only for preview and is not exported.

    • Look
    • Look strength
    • Compare with the original
  5. Underwater

    Open in the app: Underwater

    Analyse the footage to estimate and correct underwater colour loss and blue-green casts while preserving the shot's brightness.

    Use five frames to estimate one correction for the whole part. Best for footage with consistent underwater conditions.

    Adapt the correction as underwater conditions change, rather than using one average for the whole part.

    Keep the existing analysis results. Trimming, moving sliders and reopening this panel do not rerun the analysis. Run Analyse again to update it.

    How quickly the correction responds to changes. At zero, it follows each measured frame and may flicker. Smoothing does not cross shot changes.

    Fade out correction on surface shots and other non-underwater frames to avoid an orange cast.

    • Analyse this part
    • Quick analysis
    • Frame-by-frame correction
    • Lock analysis
    • Correction strength
    • Compare with the original
    • Manual adjustments
  6. Effect

    Open in the app: Effect

    Choose one motion preset for this part. Selecting another replaces the previous preset.

    Keep one area sharp and bright while softening and darkening the rest. Use keyframes to make the spotlight follow a subject.

    • Motion
    • Spotlight
  7. Volume

    Open in the app: Volume

    Part volume and source volume multiply. Mute this part silences the selected audio; fades soften its beginning and end. Preview volume changes what you hear while editing, not the exported mix.

    • Volume
    • Mute this part
    • Fade in
    • Fade out
  8. Adjust

    Open in the app: Adjust

    Exposure changes overall brightness; Contrast separates light and dark tones. Highlights and Whites affect brighter areas; Shadows and Blacks affect darker areas. Saturation changes colour intensity, while Vibrance boosts muted colours more selectively. Temperature shifts the warm–cool balance and Tint the green–magenta balance. Fade lifts dark tones for a softer look. Compare with the original after adjusting.

    Compare the original frame with this part's adjustments. The split view is only for preview and is not exported.

    • Exposure
    • Contrast
    • Saturation
    • Temperature
    • Tint
    • Highlights
    • Shadows
    • Whites
    • Blacks
    • Vibrance
    • Fade
  9. Trim

    Open in the app: Trim

    Enter seconds, m:ss.fff, or h:mm:ss.fff. Milliseconds are optional.

    • Start
    • End
  10. Speed

    Open in the app: Speed

    Lower than the base speed slows the footage down. Higher speeds it up.

    The share of the part used for each speed change. Profiles with a return use this duration for both ramps.

    The share of the part played at the target speed before returning.

    Play the picture and its motion from end to start. Music keeps playing forward; original video sound is muted.

    • Base speed
    • Speed profile
    • Target speed
    • Target position
    • Ramp duration
    • Target hold duration
    • Speed easing

Add text

Choose Add text beside a part. In Placement, Standalone part gives the text its own time; Overlay puts it over the continuing picture without extending the reel. Overlay together shares the next overlay's time. Enter your words in Text, set Position, and use Crawl and Motion for animation. Steps appears for row-based crawl timing. Colour is the background of a standalone text part.

Open in the app: Sources, in order → Open the video’s source card (scissors icon) → Preview → Add to this source → Add text → Add before / Add after

Use the arrows beside the inspector tabs to reveal more tabs. Scroll inside the settings panel to reach controls below.

Add text
Add text · Desktop
Add text · Desktop

Select an explanation to highlight its control or the entry point for the route shown. The image changes when another scroll position is needed. Rings remain transparent; enlarge the image to read small details.

Controls on this screen

  1. Placement

    Open in the app: Placement

    Plays as a separate part in the sequence, adding its duration to the reel.

    Appears over the parts underneath without stopping their playback or audio.

    Shares the time of the next overlay in the list, so both appear together. The item higher in the list is drawn over the other.

    There is no following overlay to share time with yet, so this item currently plays as a standalone part.

    • Standalone part
    • Overlay
    • Overlay together
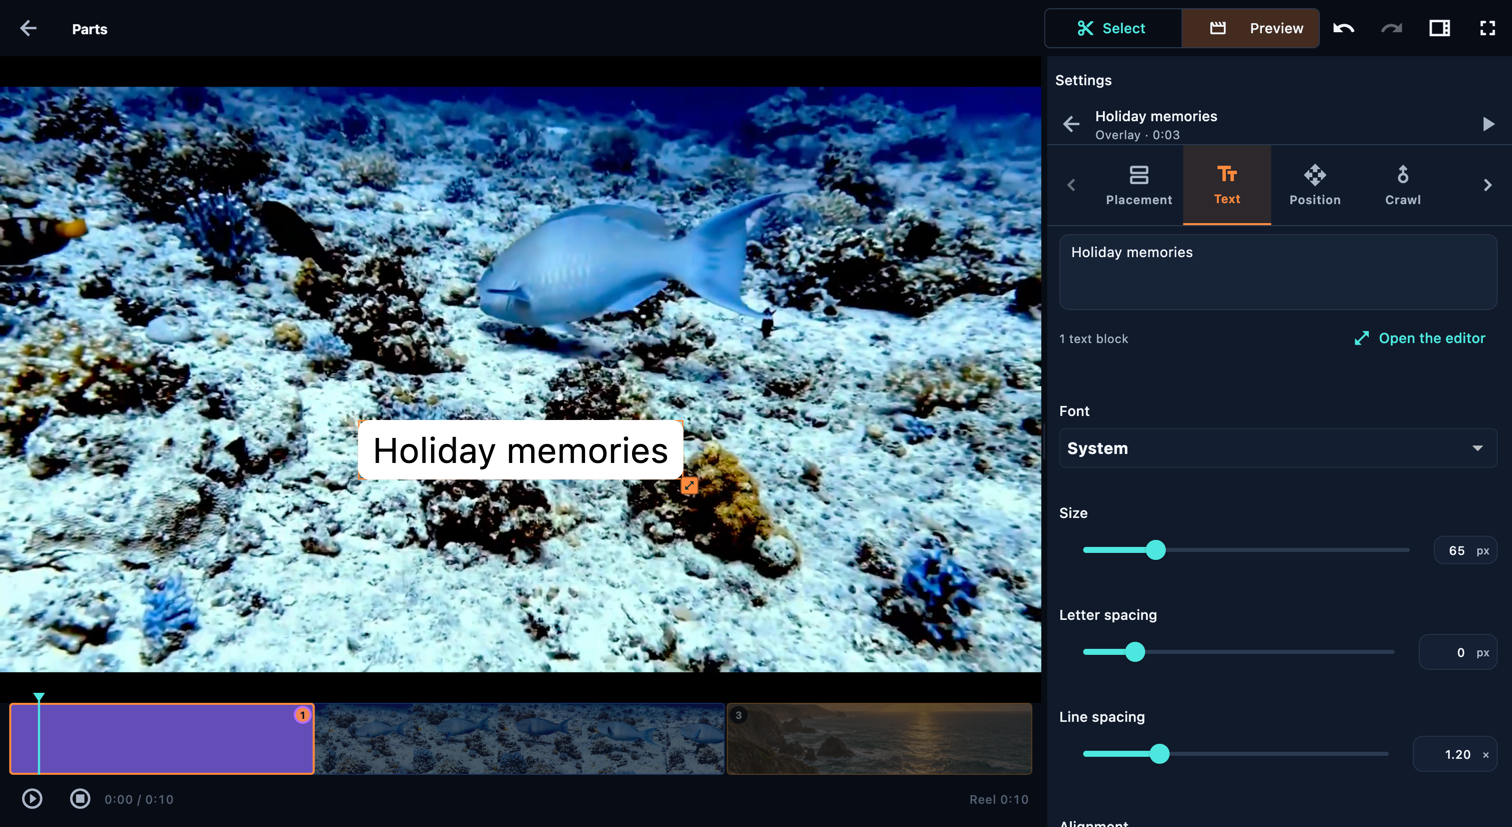
  2. Text

    Open in the app: Text

    The preview uses your imported font. Export may use a substitute if the font cannot be embedded.

    Sets the text direction for languages such as Arabic, Hebrew and Persian. This affects word order, not just alignment.

    • Open the editor
    • Font
    • Import a font
    • Size
    • Letter spacing
    • Line spacing
    • Alignment
    • Bold
    • Italic
    • Right-to-left text
    • Text colour
    • Text background
    • Text background padding
    • Shadow
    • Shadow colour
    • Shadow offset
    • Shadow softness
    • Outline colour
    • Outline width
  3. Colour

    Open in the app: Placement → Standalone part → Colour

    The title card's background colour. Black by default.

    • Background
  4. Position

    Open in the app: Position

    Drag the text on the preview to position it, or use the sliders.

    • Horizontal position
    • Vertical position
    • Size
    • Rotation
  5. Crawl

    Open in the app: Crawl

    Animate text in perspective, keep it all visible, or show one text block at a time. A block can contain several lines.

    • Steps
  6. Motion

    Open in the app: Motion

    Choose one motion preset for this part. Selecting another replaces the previous preset.

    Crawl controls this text's entrance and exit. Turn it off to animate the whole title instead.

    • Amount
    • Share of part duration
    • Return at the end
    • Entrance
    • Exit
    • While visible
    • Effect duration
    • Direction
    • Travel distance
    • Effect strength

Add image

Use the + menu beside a part to add a photo. Choose Standalone part for a timed photo in the sequence, or Overlay to show it over the continuing picture. Adjust Picture, Framing, Look and Effect; Colour controls the background of a standalone image. Add text as a separate item when the photo needs a caption.

Open in the app: Sources, in order → Open the video’s source card (scissors icon) → Preview → Add to this source → Add image → Add before / Add after

Use the arrows beside the inspector tabs to reveal more tabs. Scroll inside the settings panel to reach controls below.

Add image
Add image · Desktop
Add image · Desktop

Select an explanation to highlight its control or the entry point for the route shown. The image changes when another scroll position is needed. Rings remain transparent; enlarge the image to read small details.

Controls on this screen

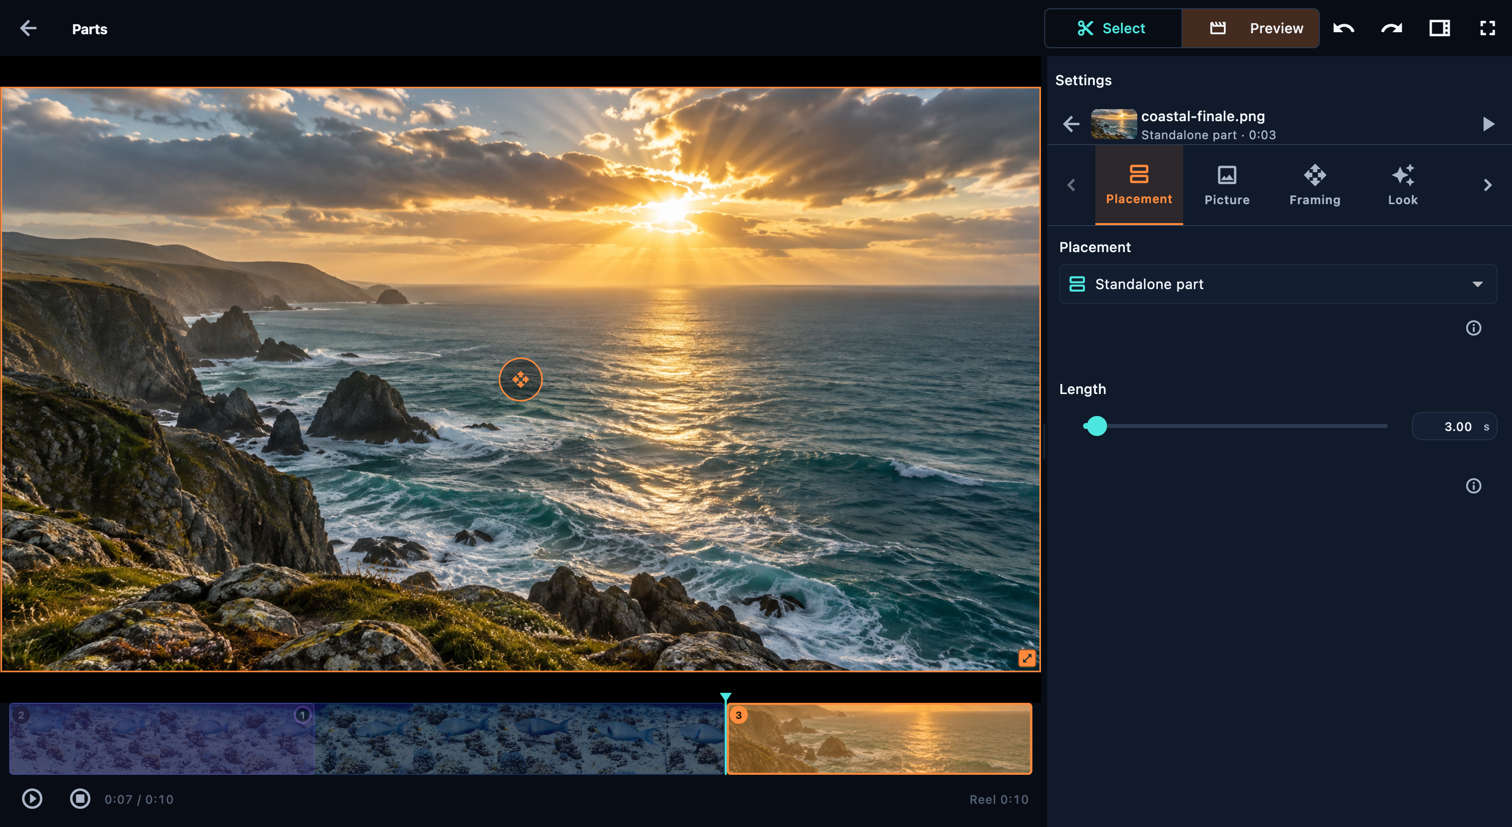
  1. Placement

    Open in the app: Placement

    Plays as a separate part in the sequence, adding its duration to the reel.

    Appears over the parts underneath without stopping their playback or audio.

    Shares the time of the next overlay in the list, so both appear together. The item higher in the list is drawn over the other.

    • Standalone part
    • Overlay
    • Overlay together
  2. Picture

    Open in the app: Picture

    Drag the image on the canvas to move it. Drag a corner to resize it.

    • Horizontal position
    • Vertical position
    • Size
    • Rotation
  3. Framing

    Open in the app: Framing

    Framing changes which edges of the picture are visible. Drag the frame handles or adjust the four crop values. Check the result in the reel's chosen aspect ratio. The flip switches mirror the picture horizontally or vertically.

    • Crop left
    • Crop right
    • Crop top
    • Crop bottom
  4. Look

    Open in the app: Look

    Preview each look on this frame at the selected strength. Select one to apply it.

    100% applies the full look. Lower values blend it with the original.

    • Look
    • Look strength
  5. Effect

    Open in the app: Effect

    Combine a gentle zoom with a slow pan to bring a still image to life.

    Photo overlays cannot use motion or spotlight effects in this build. Change the photo to a standalone part to use those effects.

    • Motion
    • Spotlight
  6. Colour

    Open in the app: Placement → Standalone part → Colour

    Colour visible around the image and through transparent areas. Black by default.

    • Background

Crawl

Animate text in perspective, keep it all visible, or show one text block at a time. A block can contain several lines.

Open in the app: Sources, in order → Open the video’s source card (scissors icon) → Preview → On the text part, choose Edit → Crawl → Animate the words

Crawl
Crawl · Desktop
Crawl · Desktop

Select an explanation to highlight its control or the entry point for the route shown. The image changes when another scroll position is needed. Rings remain transparent; enlarge the image to read small details.

Controls on this screen

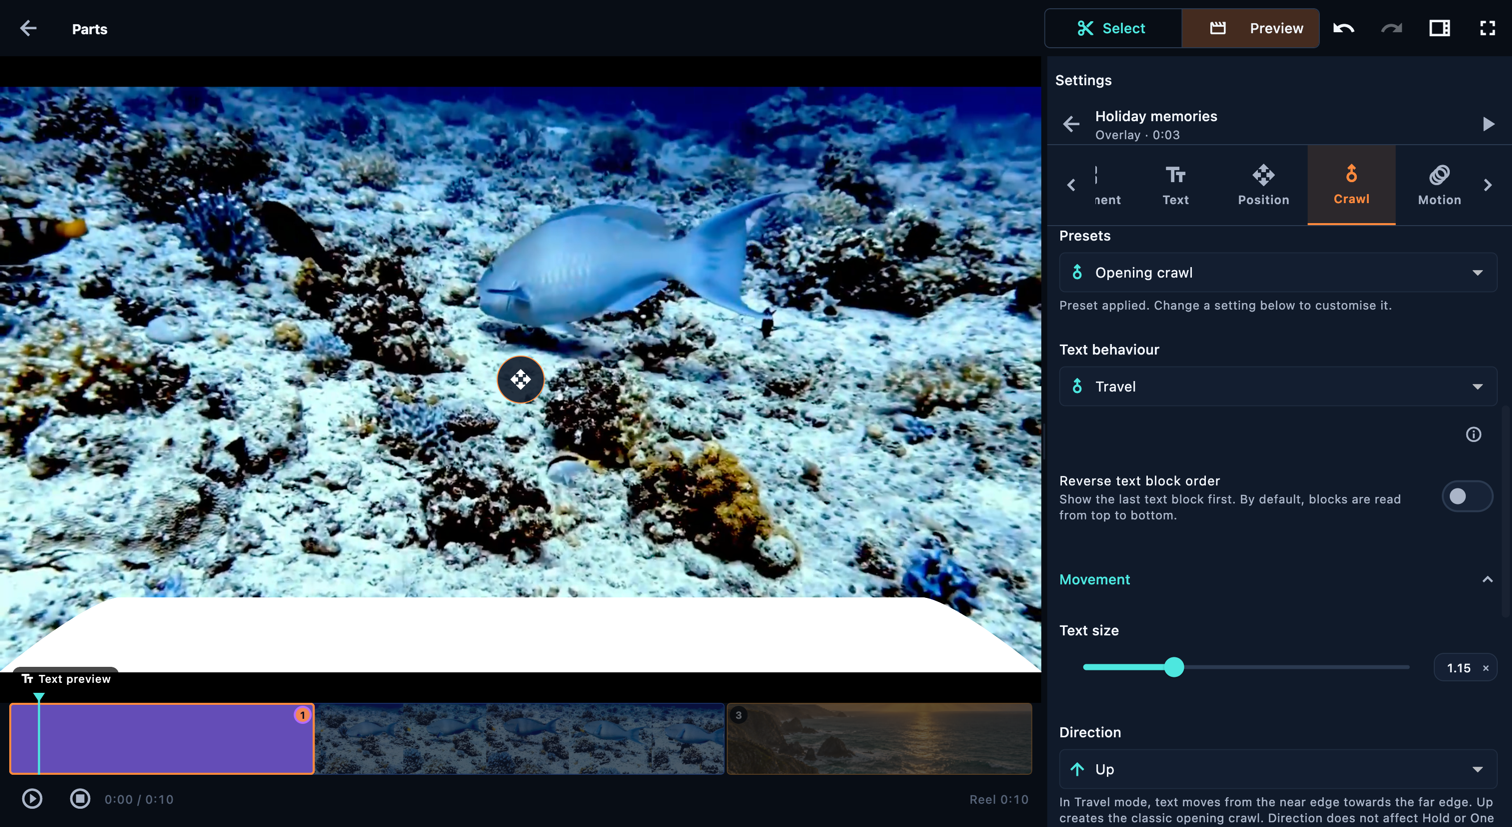
  1. Text behaviour

    Open in the app: Text behaviour

    All the text stays visible throughout. Position it using the position controls.

    Show each text block on its own, then transition to the next.

    Move text along a tilted plane, from large at the near edge to small at the far edge: the classic opening crawl.

    In Travel mode, text moves from the near edge towards the far edge. Up creates the classic opening crawl. Direction does not affect Hold or One text block at a time.

    Position the text and its movement path. Text blocks can sit near the bottom, or a crawl can move along one side.

    • Hold
    • One text block at a time
    • Travel
  2. Length

    Open in the app: Length

    All text blocks stay visible, so the reading time applies to the entire text.

    Each text block has its own reading time, excluding the transition to the next text block.

    Reading time is estimated from how long a text block remains visible during its movement.

    The total duration comes from the individual text block timings. Adjust a text block, or turn off individual timings to set the total directly.

    • Use suggested duration
  3. Steps

    Open in the app: Text behaviour → One text block at a time → Steps

    Set how long each text block stays readable before its exit effect. Reading and effect times determine the total duration.

    Show each text block on its own, then transition to the next.

  4. Lines per text block

    Open in the app: Text behaviour → One text block at a time → Steps → Lines per text block

    Fit the text into lines, then group them using the lines-per-block setting. This changes the text layout; Undo restores the previous version.

    Show the last text block first. By default, blocks are read from top to bottom.

  5. Entrance effect

    Open in the app: Text behaviour → One text block at a time → Text block entrance → Entrance effect

    Except for Fade in and None, entrances animate individual pieces. Choose their size and order under Pieces, then set the entrance duration.

    The whole text block leaves together.

    Pieces leave in sequence, using the size and order chosen under Pieces.

  6. Animate by

    Open in the app: Text behaviour → Travel → Text block exit → Flash away → Pieces → Animate by

    All the text moves together.

    Each text block moves separately when it reaches the trigger position.

    Each text block is split into words, which move in sequence.

    Animate individual characters. This is the finest text-based split and takes the most preparation.

    Split each text block into a grid of small rectangular pieces of the text. This is the default split for burst effects.

    Split the visible strokes of the letters into tiny independent fragments.

  7. Blank time at the end

    Open in the app: Blank time at the end

    Added after the length: how long the background stays on screen once the text has disappeared.

Music

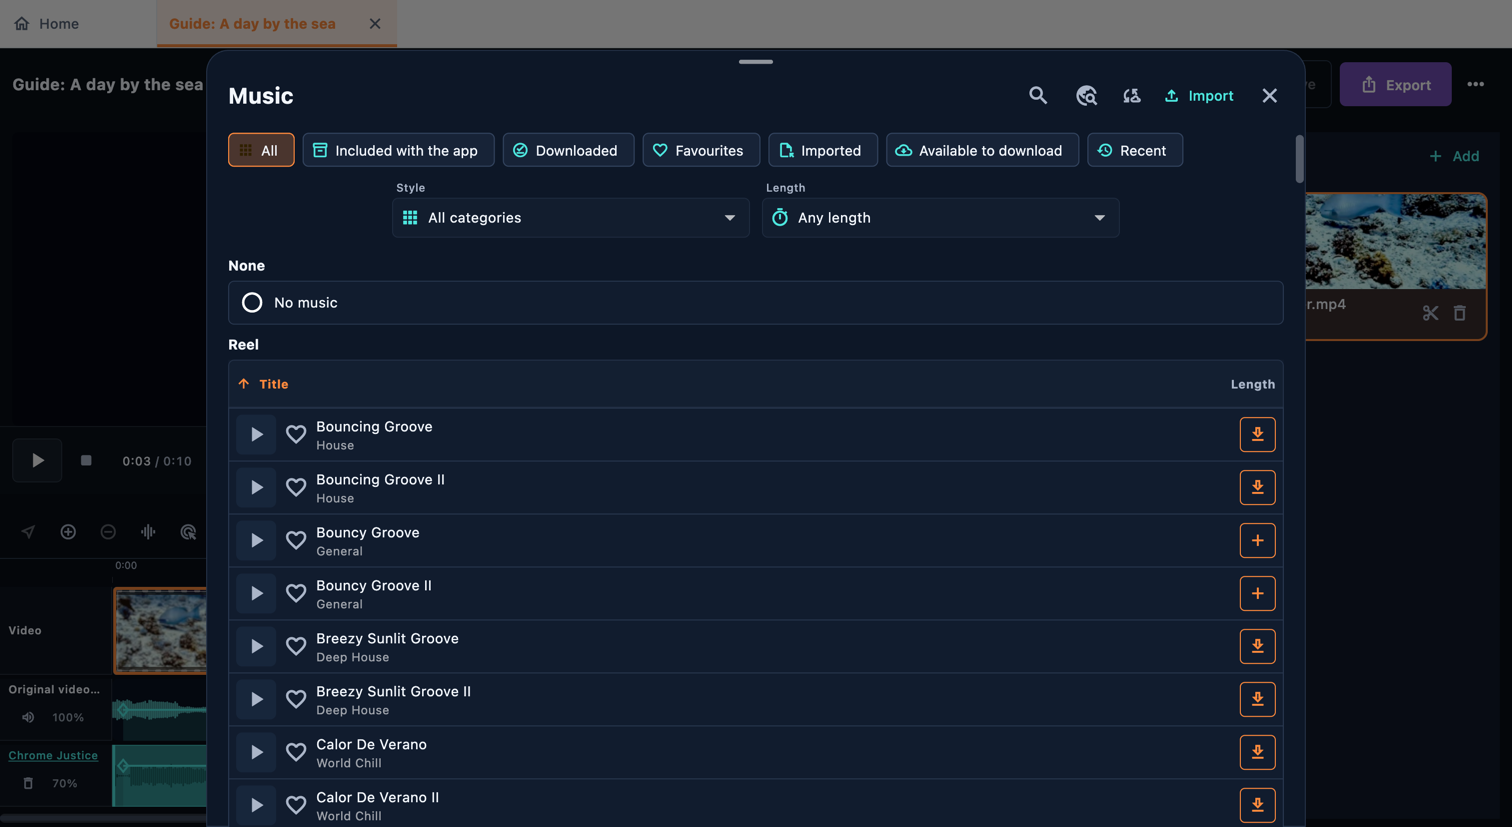
In the reel editor, open Music. Search by title or narrow the library by category, length and availability. Play preview auditions a track; + adds it to the reel. Included tracks work offline; other library tracks may need a download. You can also import an audio file. Open the music block to set when it starts and ends in the reel, where it starts inside the song, and its volume. Set fades in the main music panel. Adding the first track mutes source audio; restore the source or part volume if you want a mix.

Open in the app: Reel → Music

Music
Music · Desktop
Music · Desktop

Select an explanation to highlight its control or the entry point for the route shown. The image changes when another scroll position is needed. Rings remain transparent; enlarge the image to read small details.

Controls on this screen

  1. Show

    Open in the app: Show

    This track is listed in the catalogue, but its audio is not on this device. Download it or import the audio file to use it.

    • Included with the app
    • Downloaded
    • Favourites
    • Imported
    • Available to download
    • Recent
  2. Search music

    Open in the app: Search music

    Search by title, then narrow the results by category, track length and availability. Clear the filters to see more tracks.

    • Style
    • Length
    • Title
  3. Play preview

    Open in the app: Play preview

    Play auditions the track. The heart saves a favourite. Use + to add music; if the reel already has music, choose a block to replace or add another. Download unavailable audio first.

    • Favourite
    • Add as new
    • Download
    • Cancel download
  4. Import music

    Open in the app: Import music

    Import an audio file into your library, then use + on its row to add it to the reel. Importing alone does not change the reel.

    Find a track on pixabay.com and paste its link here. The audio will be downloaded to this device and added to your library.

    • Get music from Pixabay
    • Check for new music
  5. In this reel

    Open in the app: In this reel

    Preview a track, then select it to replace the music in this block. The block's other settings stay the same.

    • No music
    • Choose music
  6. Music settings

    Open in the app: Music settings

    Gradually increase the music volume at the start and lower it at the end.

    Set how loud this music plays. Adding the first track mutes the original video audio; raise the source or part volume to mix it back in.

    • Music volume
    • Fade in
    • Fade out
    • Start music at

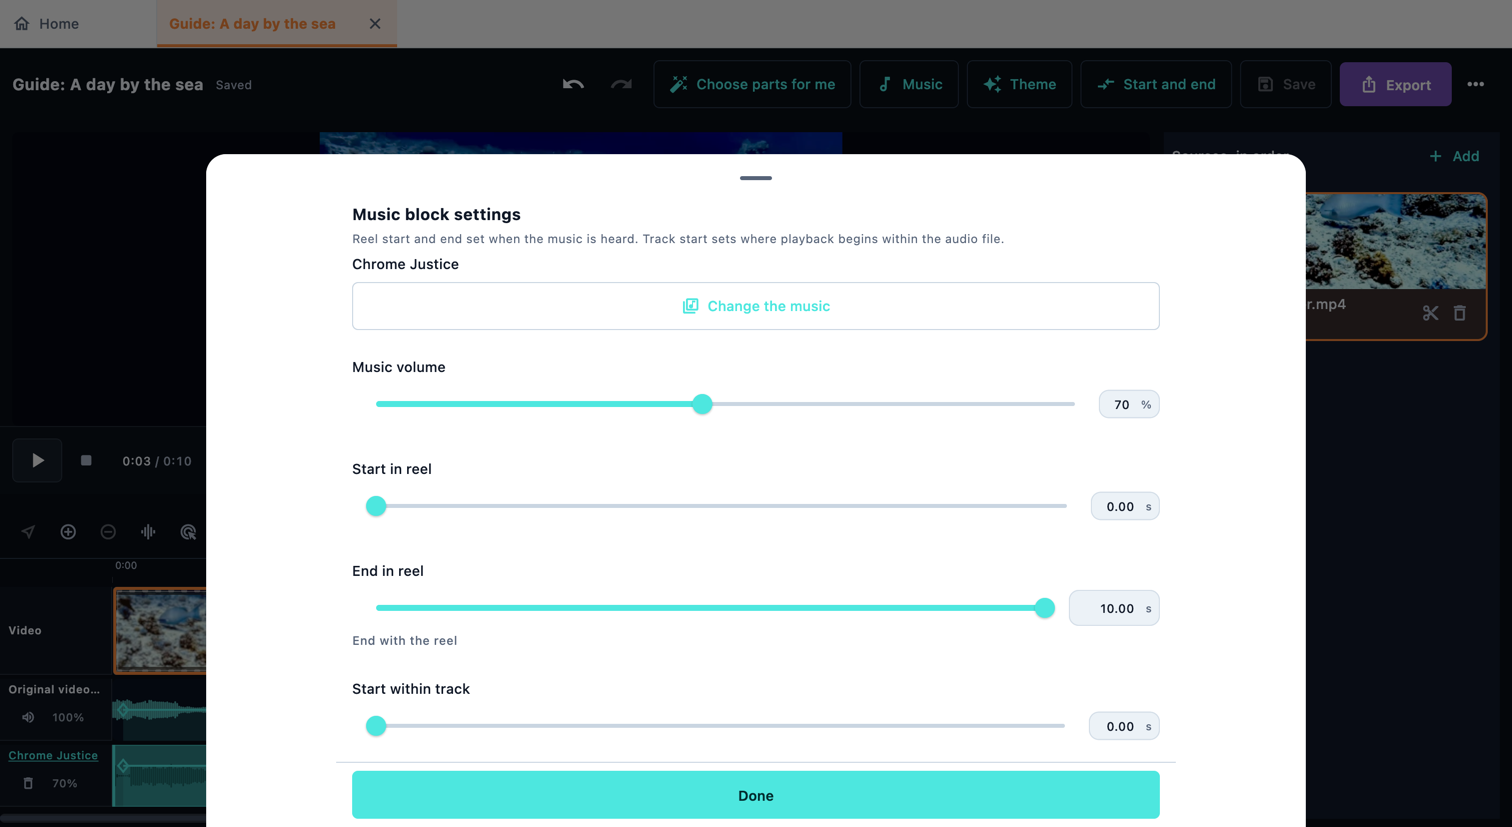
Music block settings

Reel start and end set when the music is heard. Track start sets where playback begins within the audio file.

Open in the app: Reel → Music → In this reel → Music block settings

Music block settings
Music block settings · Desktop

Select an explanation to highlight its control or the entry point for the route shown. The image changes when another scroll position is needed. Rings remain transparent; enlarge the image to read small details.

Controls on this screen

  1. Change the music

    Open in the app: Change the music

    Preview a track, then select it to replace the music in this block. The block's other settings stay the same.

    • Choose music
    • Add as new
  2. Start in reel

    Open in the app: Start in reel

    Reel start and end set when the music is heard. Track start sets where playback begins within the audio file.

    • End in reel
    • End with the reel
    • Start within track
  3. Music volume

    Open in the app: Music volume

    Set how loud this music plays. Adding the first track mutes the original video audio; raise the source or part volume to mix it back in.

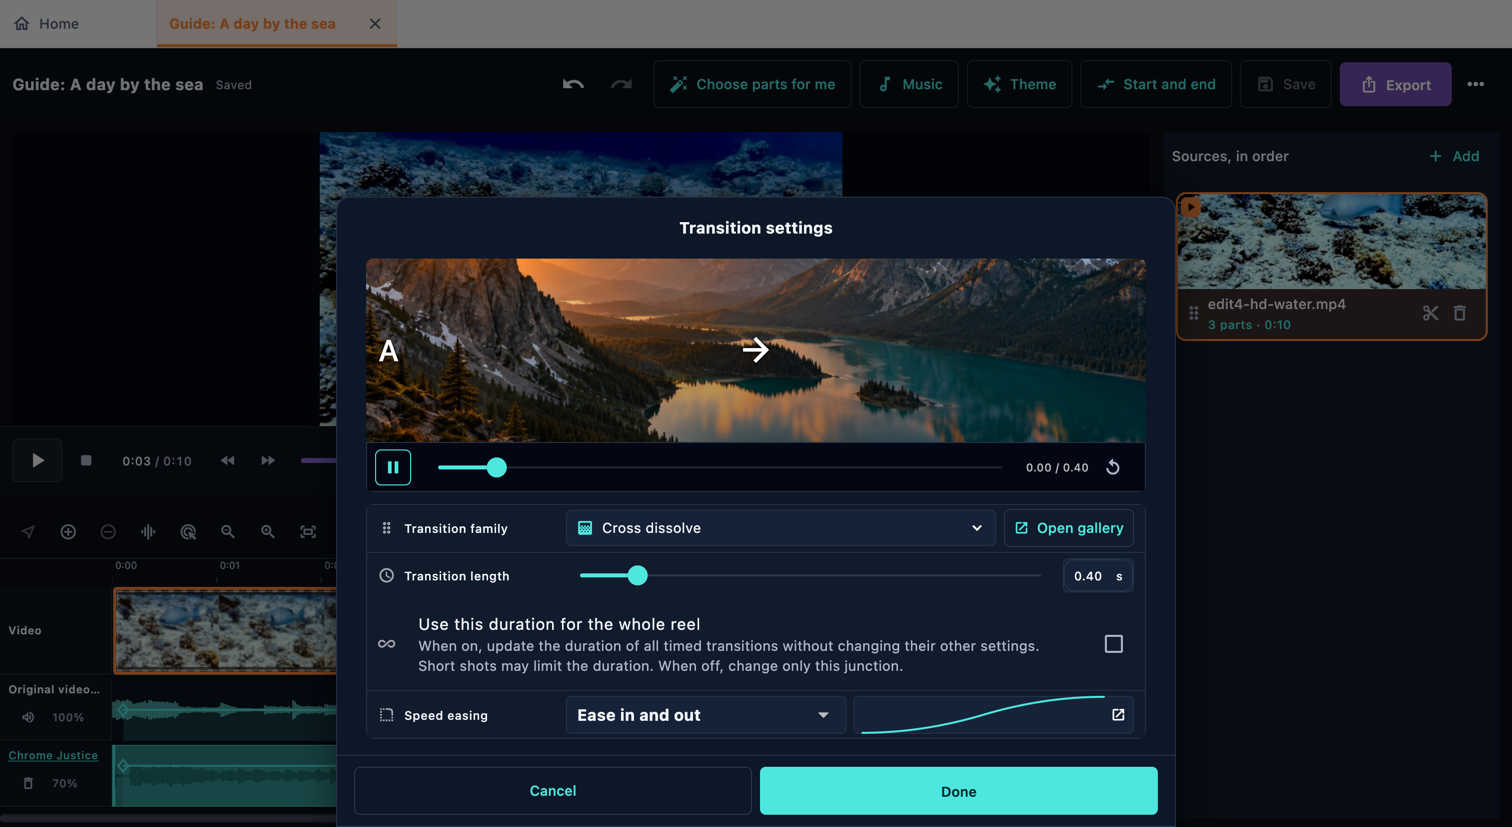
Transition between parts

Open the transition row between two parts. Preview choices in the gallery, pick one and set its timing, then confirm. Watch the join in context: a transition can hide a short action or text. Start and end treatments belong to the reel, while a join connects its neighbouring parts.

Open in the app: Sources, in order → Open the video’s source card (scissors icon) → Preview → Transition between parts

Transition between parts
Transition between parts · Desktop

Select an explanation to highlight its control or the entry point for the route shown. The image changes when another scroll position is needed. Rings remain transparent; enlarge the image to read small details.

Controls on this screen

  1. Open gallery

    Open in the app: Open gallery

    Preview each transition using this junction's duration and strength. Select one to apply it.

    • Search transitions
    • Transition family
  2. Transition settings

    Open in the app: Transition settings

    Open the transition row between two parts. Preview choices in the gallery, pick one and set its timing, then confirm. Watch the join in context: a transition can hide a short action or text. Start and end treatments belong to the reel, while a join connects its neighbouring parts.

    • First half duration
    • Second half duration
    • Hold colour
    • Custom easing curve
  3. Use this duration for the whole reel

    Open in the app: Use this duration for the whole reel

    When on, update the duration of all timed transitions without changing their other settings. Short shots may limit the duration. When off, change only this junction.

    • First half duration
    • Second half duration
  4. My transitions

    Open in the app: Done → Home → Transitions → My transitions

    Preview every built-in transition, then create and manage your own reusable transitions.

    • Create transition
    • Transition name
    • Built-in · read-only
    • Custom transition

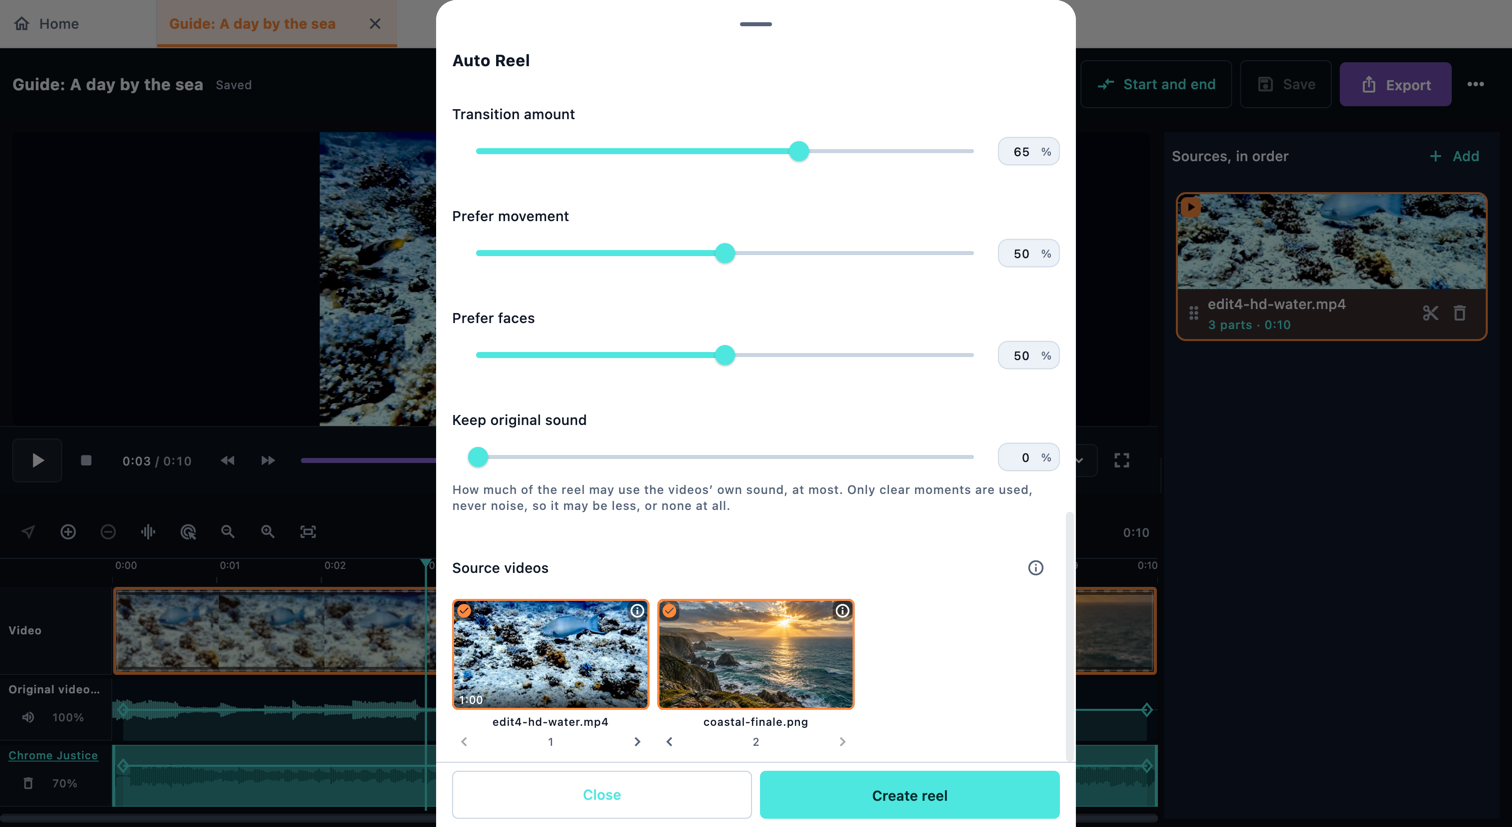
Auto Reel

Auto Reel can take several minutes. The time depends on your device’s performance, your footage and the analysis settings.

Open in the app: Home → Auto reel

Auto Reel
Auto Reel · Desktop
Auto Reel · Desktop

Select an explanation to highlight its control or the entry point for the route shown. The image changes when another scroll position is needed. Rings remain transparent; enlarge the image to read small details.

Controls on this screen

  1. Source videos

    Open in the app: Source videos

    Drag a source, or use the arrows, to set the order the reel runs them in.

    • Move earlier
    • Move later
  2. Target reel duration

    Open in the app: Target reel duration

    The app chooses the reel length from the strongest usable moments and the selected music.

    Use the requested length. If it is not possible, a shorter option will be offered.

    • Automatic duration
    • Exact duration
  3. Choose music

    Open in the app: Choose music

    Picked after the videos are analysed, to fit their length and movement.

    • Choose for me
    • Music start point
    • Keep the music start point
  4. Style

    Open in the app: Style

    At zero, all joins are hard cuts. Higher values use more transitions and make them longer.

    How much of the reel may use the videos’ own sound, at most. Only clear moments are used, never noise, so it may be less, or none at all.

    • Pace
    • Shot order
    • Prefer movement
    • Prefer faces
    • Transition amount
    • Keep original sound
  5. Precision

    Open in the app: Precision

    Lower precision speeds creation by using fewer samples; 100% makes no change.

    Analyses and applies the default underwater correction before creating the reel.

    • Underwater footage
    • Create reel
  6. What happens behind the scenes

    Open in the app: Read more

    If Underwater is on, we first check frames throughout each video and work out colour corrections before choosing scenes.

    We scan your videos to find scene changes, subjects and interesting moments.

    We pick usable sections, avoiding shaky, blurry, blank or badly exposed footage and repeated moments.

    We analyse the music’s rhythm and changes in energy. With Choose for me, we also find a track that suits your footage.

    We arrange and trim the scenes to fit your duration, pace, order and style, timing cuts and transitions to the music where appropriate.

    We check the chosen scenes more closely, including their first and last frames, and adjust the edit if needed.

    We finish the sound mix, keeping suitable original sound if requested, and build an editable reel. More or longer videos and higher precision mean more work for your device.

    • Read more

Templates

A template combines a transition theme, looks, movement, a part pattern and music choices. It still needs your media. Inspect its settings, use it, then review the resulting parts. Choose New to create a template, or duplicate one to edit your own version. Pattern steps control allowed media, relative length and movement; an automatic pattern lets the app choose.

Open in the app: Templates

Templates
Templates · Desktop
Templates · Desktop

Select an explanation to highlight its control or the entry point for the route shown. The image changes when another scroll position is needed. Rings remain transparent; enlarge the image to read small details.

Controls on this screen

  1. Use template

    Open in the app: Use template

    Built-in templates cannot be edited. Duplicate this one to make it yours.

    • All
    • Built-in
    • My templates
    • Category
  2. Editing recipe

    Open in the app: New template → Editing recipe

    Choose the options the template can apply to each part. Using the same seed and source material produces the same choices.

    When off, always use the first option in each selected list.

    Leave the pattern empty to let Auto Reel choose the number and length of shots for your target duration.

    The pattern repeats as needed to fill the reel. It defines a rhythm, not a fixed list of clips.

    1× follows the reel's usual pace. All steps are scaled together to fit the target duration.

    • Available themes
    • Available looks
    • Available motion presets
    • Structure
    • Vary choices by part
    • Relative shot length
    • Add pattern step
    • Use automatic pacing
    • Images
    • Videos
  3. Music

    Open in the app: New template → Music

    Keep existing music preserves the reel’s music. Suggested music lets the template choose a matching track. Some bundled templates specify a fixed track; the template editor offers Keep existing music and Suggested music. Review the result in the reel’s Music panel.

    • Fixed track
    • Keeps your music
    • Suggests a track
  4. New template

    Open in the app: New template

    A template combines a transition theme, looks, movement, a part pattern and music choices. It still needs your media. Inspect its settings, use it, then review the resulting parts. Choose New to create a template, or duplicate one to edit your own version. Pattern steps control allowed media, relative length and movement; an automatic pattern lets the app choose.

    • New template
    • Duplicate
    • Name
    • Description

Settings

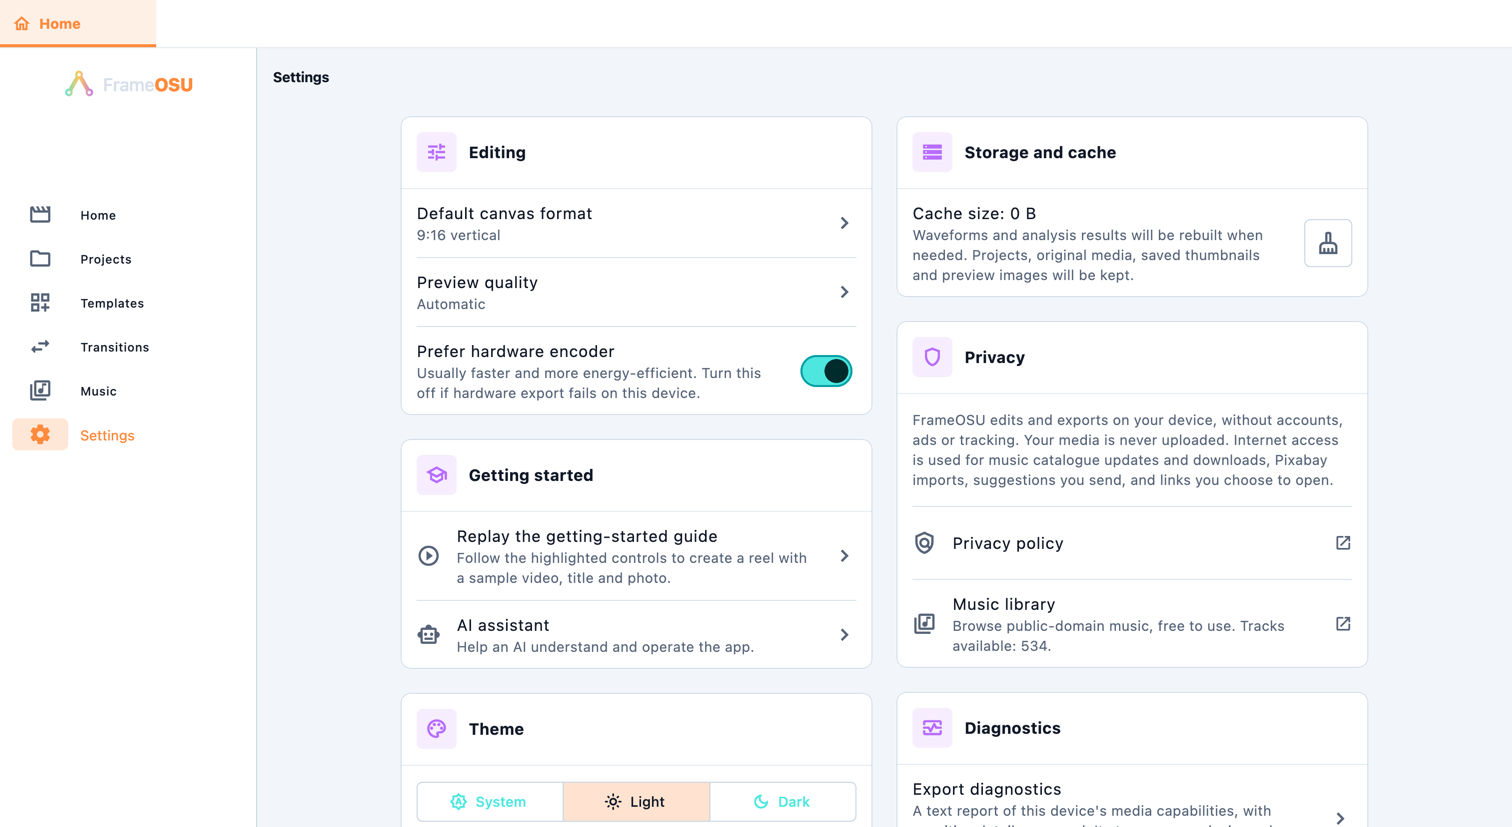
FrameOSU edits and exports on your device, without accounts, ads or tracking. Your media is never uploaded. Internet access is used for music catalogue updates and downloads, Pixabay imports, suggestions you send, and links you choose to open.

Open in the app: Settings

Settings
Settings · Desktop
Settings · Desktop

Select an explanation to highlight its control or the entry point for the route shown. The image changes when another scroll position is needed. Rings remain transparent; enlarge the image to read small details.

Controls on this screen

  1. Editing

    Open in the app: Editing

    Usually faster and more energy-efficient. Turn this off if hardware export fails on this device.

    • Preview quality
    • Default canvas format
    • Prefer hardware encoder
  2. Getting started

    Open in the app: Getting started

    Follow the highlighted controls to create a reel with a sample video, title and photo.

    • Replay the getting-started guide
  3. Theme

    Open in the app: Theme

    Choose the interface language and colour theme. System follows the device appearance; Light, Dark and Pure black keep the chosen appearance. These settings change the editor interface, not the colours in your exported video.

    • Language
    • System
    • Light
    • Dark
    • Pure black
  4. Accessibility

    Open in the app: Accessibility

    Feel a short vibration when snapping on the timeline, splitting a clip or confirming a destructive action.

    Places the tools and playback controls on the left.

    • Reduce motion
    • High contrast
    • Haptic feedback
    • Left-handed timeline
  5. Storage and cache

    Open in the app: Storage and cache

    Waveforms and analysis results will be rebuilt when needed. Projects, original media, saved thumbnails and preview images will be kept.

    Remove downloaded audio files without removing their catalogue entries. You can download them again later.

    • Clear caches
    • Downloaded music
  6. Privacy

    Open in the app: Privacy

    FrameOSU edits and exports on your device, without accounts, ads or tracking. Your media is never uploaded. Internet access is used for music catalogue updates and downloads, Pixabay imports, suggestions you send, and links you choose to open.

    • Privacy policy
    • Music library
  7. Diagnostics

    Open in the app: Diagnostics → Export diagnostics

    A text report of this device's media capabilities, with sensitive details removed. It stays on your device unless you share it.

    • Export diagnostics
  8. About

    Open in the app: About

    Restore the default settings? Your projects, media and exports will not be changed.

    • Suggest an improvement
    • Reset all settings

Export reel

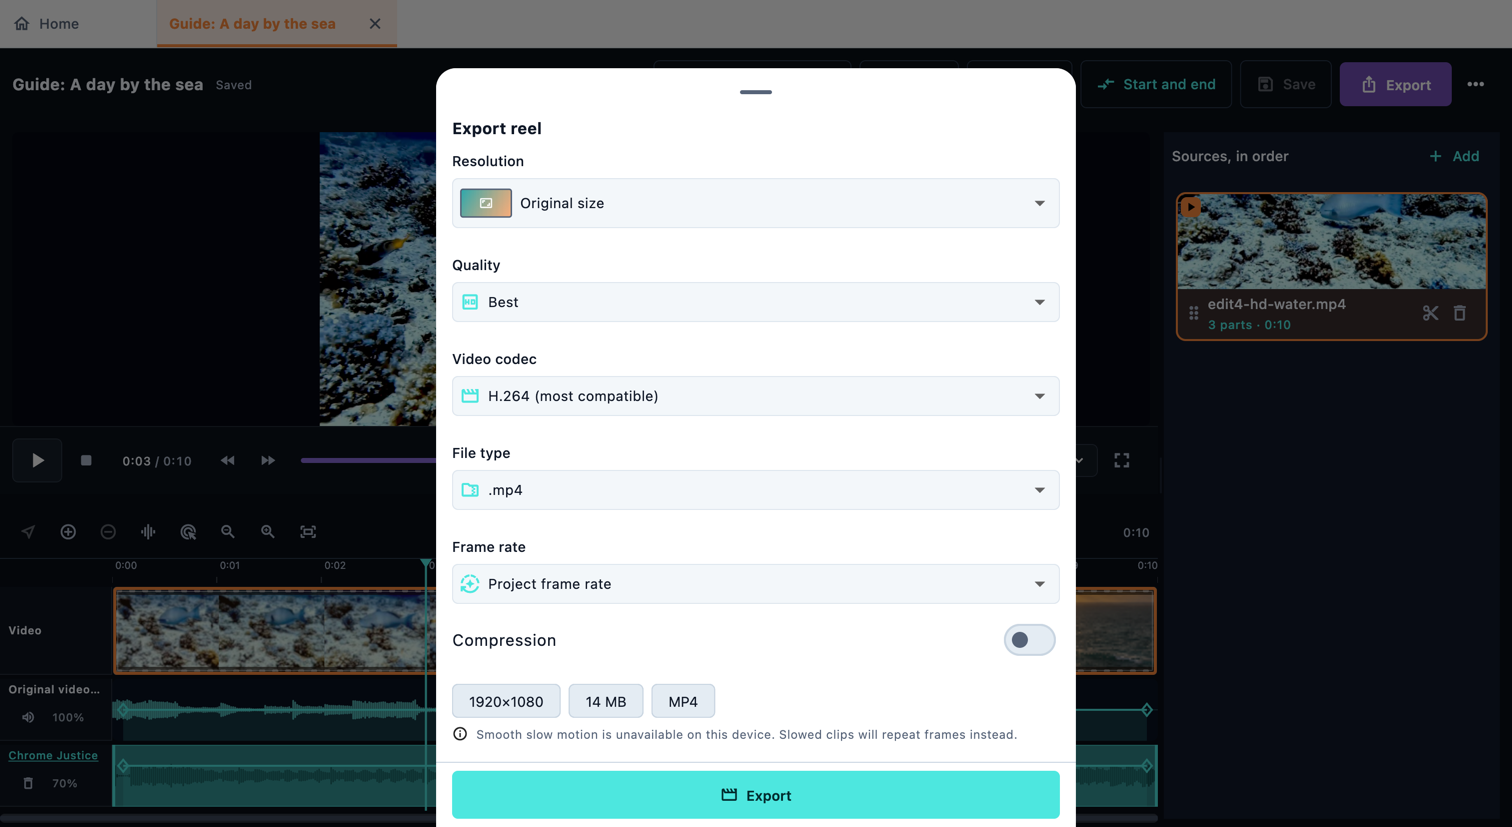
After watching the whole reel, open Export to choose the final video's size and quality.

Open in the app: Reel → Export reel

Export reel
Export reel · Desktop

Select an explanation to highlight its control or the entry point for the route shown. The image changes when another scroll position is needed. Rings remain transparent; enlarge the image to read small details.

Controls on this screen

  1. Export preset

    Open in the app: Export preset

    Return to the Reel page and watch from beginning to end with sound. Check the first frame, every join, text readability, music and the ending. Save the editable project, then open Export. Choose the size, quality and a format your device supports. Wait for completion and open the exported file to check it. Saving a project and exporting a video are different actions.

    • Resolution
    • Quality
    • Width
    • Height
  2. Video codec

    Open in the app: Video codec

    Available formats depend on your device. Choose a codec, file type and frame rate that the app supports together. If a combination is unavailable, change these options before starting the export.

    • H.264 (most compatible)
    • HEVC (efficient compression)
    • File type
    • Frame rate
    • Project frame rate
  3. Compression

    Open in the app: Compression

    Higher bitrates can improve quality but create larger files. Auto uses the selected quality setting.

    • Video bitrate
    • Audio bitrate
  4. Export

    Open in the app: Export

    Return to the Reel page and watch from beginning to end with sound. Check the first frame, every join, text readability, music and the ending. Save the editable project, then open Export. Choose the size, quality and a format your device supports. Wait for completion and open the exported file to check it. Saving a project and exporting a video are different actions.

    • Preparing…
    • Exporting
    • Cancel export
    • Reel exported
    • Show in folder
    • Export cancelled
    • Export failed

AI assistant

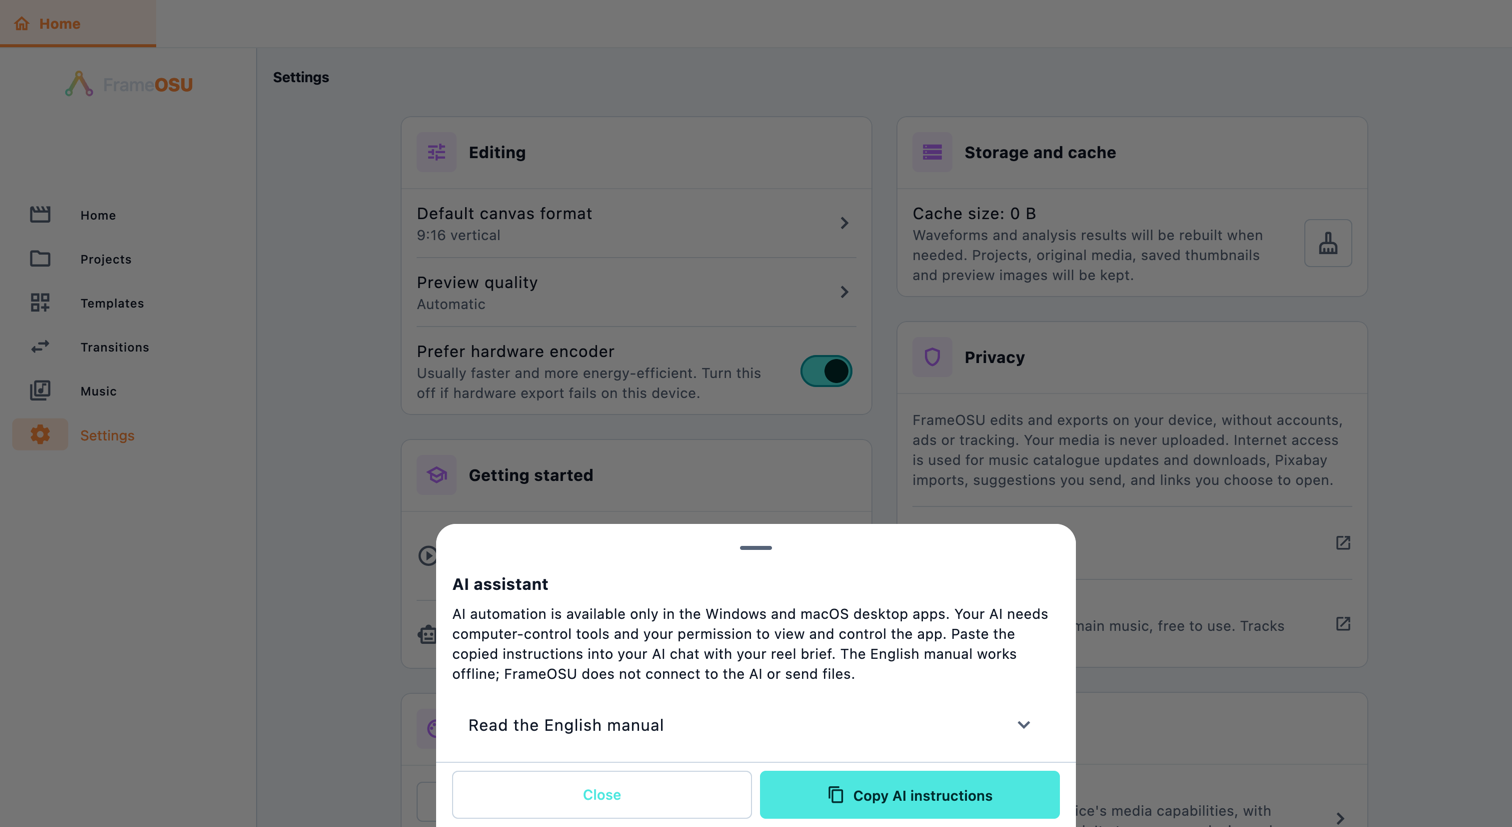
AI automation is available only in the Windows and macOS desktop apps. Your AI needs computer-control tools and your permission to view and control the app. Paste the copied instructions into your AI chat with your reel brief. The English manual works offline; FrameOSU does not connect to the AI or send files.

Open in the app: Settings → Getting started → AI assistant

AI assistant · Desktop

Select an explanation to highlight its control or the entry point for the route shown. The image changes when another scroll position is needed. Rings remain transparent; enlarge the image to read small details.

Controls on this screen

  1. Read the English manual

    Open in the app: Read the English manual

    Help an AI understand and operate the app.

  2. Copy AI instructions

    Open in the app: Copy AI instructions

    AI automation is available only in the Windows and macOS desktop apps. Your AI needs computer-control tools and your permission to view and control the app. Paste the copied instructions into your AI chat with your reel brief. The English manual works offline; FrameOSU does not connect to the AI or send files.

    • Close